> ## Documentation Index
> Fetch the complete documentation index at: https://stackone-hub-docs-confluence-api-token-update.mintlify.site/llms.txt
> Use this file to discover all available pages before exploring further.
# Bullhorn Recruitment Cloud - Salesforce (OAuth)
> Follow these steps to connect Bullhorn Recruitment Cloud - Salesforce via the StackOne Hub successfully.
Ensure that your Bullhorn Recruitment Cloud - Salesforce account has Admin privileges.
If you've been directed to StackOne to integrate with Bullhorn Recruitment Cloud - Salesforce, the following steps will help you understand the process and any necessary actions to configure a successful integration.
## Log in to Salesforce
Log in to your Salesforce instance.
## Find your Bullhorn Recruitment Cloud - Salesforce Salesforce URL
Your Salesforce URL can be found in the URL when logged in to Bullhorn Recruitment Cloud - Salesforce.
Given the URL: `https://mycompany.salesforce.com/dashboard/settings`, the **Salesforce URL** is `https://mycompany.salesforce.com`.
## Create your Client ID and Client Secret
This integration will authenticate on behalf of a registered application in Bullhorn Recruitment Cloud - Salesforce.
Follow the [Salesforce Client Credentials Guide](https://developer.salesforce.com/blogs/2023/03/using-the-client-credentials-flow-for-easier-api-authentication) to create your Salesforce OAuth Application.
Store your Client ID and Client Secret securely to be used in a later step.
The integration accesses the following Salesforce objects. Please ensure that the associated User has read or read/write access to these as required for your use case:
* TR1\_\_ContactDocument\_\_c
* TR1\_\_Application\_\_c
* TR1\_\_Job\_Board\_Application\_\_c
* Contact
* TR1\_\_Job\_\_c
Write operations may trigger automations depending on your Salesforce configuration that may require additional permissions.
## Enter Job Board Application Custom Fields (optional)
The integration utilizes the following fields from the Salesforce **TR1\_\_Job\_Board\_Application\_\_c** model:
* `Id`
* `Name`
* `TR1__Job__c`
* `TR1__Applicant__c`
* `TR1__Job_Board_Source__c`
* `TR1__Source__c`
* `TR1__Status__c`
* `CreatedDate`
* `LastModifiedDate`
To include any additional fields from this model, enter a comma-separated list of the field names.
## Enter Shortlist Application Custom Fields (optional)
The integration utilizes the following fields from the Salesforce **TR1\_\_Application\_\_c** model:
* `Id`
* `TR1__Applicant__c`
* `TR1__Job__c`
* `TR1__Stage__c`
* `TR1__ATS_Stage__c`
* `TR1__Status__c`
* `TR1__Source__c`
* `TR1__Job_Board_Source__c`
* `CreatedDate`
* `LastModifiedDate`
To include any additional fields from this model, enter a comma-separated list of the field names.
## Enter Candidate Custom Fields (optional)
The integration utilizes the following fields from the Salesforce **Contact** model:
* `Id`
* `FirstName`
* `LastName`
* `Name`
* `Email`
* `TR1__Work_Email__c`
* `TR1__Secondary_Email__c`
* `Main_Email__c`
* `Personal_Email__c`
* `MobilePhone`
* `Phone`
* `HomePhone`
* `AssistantPhone`
* `Work_Phone__c`
* `OtherPhone`
* `Title`
* `Company_Name_Text__c`
* `TR1__Candidate_Status__c`
* `TR1__LinkedIn_ProfileUrl__c`
* `MailingCountry`
* `CreatedDate`
* `LastModifiedDate`
To include any additional fields from this model, enter a comma-separated list of the field names.
## Enter Job Custom Fields (optional)
The integration utilizes the following fields from the Salesforce **TR1\_\_Job\_\_c** model:
* `Id`
* `Name`
* `TR1__Job_Number__c`
* `TR1__Job_Title__c`
* `Job_Description__c`
* `TR1__Status__c`
* `TR1__Hiring_Manager__c`
* `TR1__Is_Confidential__c`
* `CreatedDate`
* `LastModifiedDate`
To include any additional fields from this model, enter a comma-separated list of the field names.
## Connecting with StackOne
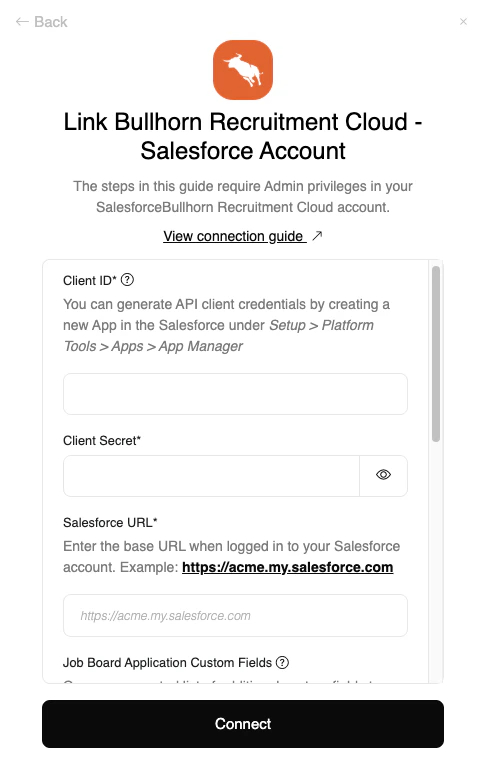
Upon reaching the Link Account page, enter the credential(s) from the previous steps:
* **Client ID**
* **Client Secret**
* **Salesforce URL**
* **Job Board Application Custom Fields** (optional)
* **Shortlist Application Custom Fields** (optional)
* **Candidate Custom Fields** (optional)
* **Job Custom Fields** (optional)
Proceed by clicking the Connect button.
Congratulations, you're all set! If you face any issues with the steps mentioned above,
please contact us by emailing [integrations@stackone.com](mailto:integrations@stackone.com). We're always here to assist you!
## Available data
This integration has the following [ATS Resources](https://docs.stackone.com/reference/getting-started-with-your-api) available from the provider:
- Applications
- Applications Documents
- Application Notes
- Candidates
- Application Stages
- Job Postings
- Jobs