> ## Documentation Index
> Fetch the complete documentation index at: https://stackone-hub-docs-confluence-api-token-update.mintlify.site/llms.txt
> Use this file to discover all available pages before exploring further.
# SAP SuccessFactors
> Follow these steps to connect SAP SuccessFactors with StackOne Hub successfully.
Ensure you have Admin privileges for your SAP SuccessFactors account.
If you've been directed to StackOne to integrate with SAP SuccessFactors, the following steps will help you understand the process and any necessary actions to configure successful integration.The type of Authentication
flow you follow will depend on your use case.
* If you are working with an external LXB/LMS to pull data into your SAP instance, you will need to follow the Authentication Flow 1.
* If you are working with an external content provider to pull external content into your SAP instance, you will need to follow the Authentication Flow 2.
* If you need to write data to your SAP instance using Platform Token Server Authentication, you will need to follow the Authentication Flow 3.
# Authentication Flow 1: Linking your SAP instance library to an external LXB/LMS to pull data
## Locating Credentials
### Finding the Learning Hub URL
Log into SAP SuccessFactors.
Type Learning Administration in the search bar and select the Learning Administration module.
Look in the browser address bar for the URL and save the address.
 In this case: [https://sfcpart000906.scdemo.successfactors.com/](https://sfcpart000906.scdemo.successfactors.com/) is the access point.
Use this value as the `Learning Domain URL` value when connecting SAP SuccessFactors to StackOne.
### Finding Company ID
Select your profile image in the upper right-hand corner of the screen to open the dropdown modal
Within the modal that appears, you will see `Company ID`. Copy and note down this value.
In this case: [https://sfcpart000906.scdemo.successfactors.com/](https://sfcpart000906.scdemo.successfactors.com/) is the access point.
Use this value as the `Learning Domain URL` value when connecting SAP SuccessFactors to StackOne.
### Finding Company ID
Select your profile image in the upper right-hand corner of the screen to open the dropdown modal
Within the modal that appears, you will see `Company ID`. Copy and note down this value.
 ### Finding Username and Client Secret
**If you are setting up SAP for creating content via OCN, please follow the below steps to create an OCN Admin Role and User and use that username.**
From SuccessFactors go to Learning Administration > System Administration > Security > Administrators
Search for the administrator for this integration and click the edit icon.
Note down the AdminID for this UserActivation.
Click Generate Client Secret and note this down.
## Additional Configuration if syncing Skills and Competencies via API endpoints (Optional)
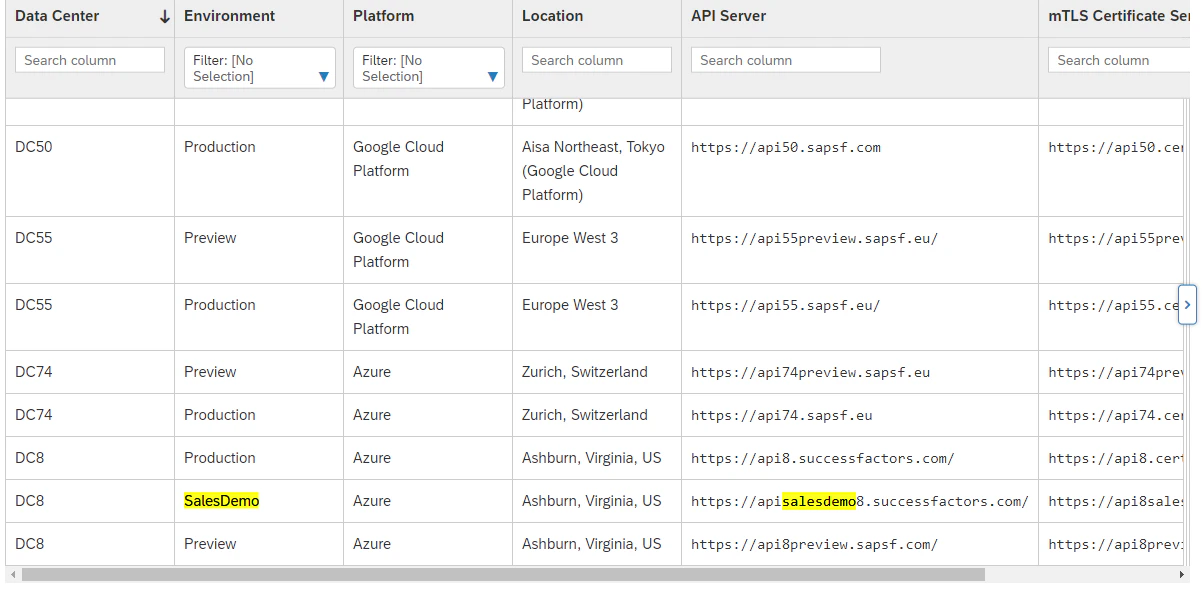
### Locating API Server
SAP uses multiple API server addresses. You will need to look up the API server that corresponds to your tenant domain on this [table](https://help.sap.com/docs/SAP_SUCCESSFACTORS_PLATFORM/d599f15995d348a1b45ba5603e2aba9b/af2b8d5437494b12be88fe374eba75b6.html) under the `API Server` column.
For example, if your domain was `https://pmsalesdemo8.successfactors.com/` you would search for `salesdemo8` in the table. If the server is not listed, you may be able to find it by searching online or contacting your provider for support.
### Finding Username and Client Secret
**If you are setting up SAP for creating content via OCN, please follow the below steps to create an OCN Admin Role and User and use that username.**
From SuccessFactors go to Learning Administration > System Administration > Security > Administrators
Search for the administrator for this integration and click the edit icon.
Note down the AdminID for this UserActivation.
Click Generate Client Secret and note this down.
## Additional Configuration if syncing Skills and Competencies via API endpoints (Optional)
### Locating API Server
SAP uses multiple API server addresses. You will need to look up the API server that corresponds to your tenant domain on this [table](https://help.sap.com/docs/SAP_SUCCESSFACTORS_PLATFORM/d599f15995d348a1b45ba5603e2aba9b/af2b8d5437494b12be88fe374eba75b6.html) under the `API Server` column.
For example, if your domain was `https://pmsalesdemo8.successfactors.com/` you would search for `salesdemo8` in the table. If the server is not listed, you may be able to find it by searching online or contacting your provider for support.
 Copy the value in the `API Server` column (remove the final forward-slash `/`). In this example, the value would be `https://apisalesdemo8.successfactors.com`.
Use this value as the `API Server` value when connecting SAP SuccessFactors to StackOne.
### Locating API password
In the SuccessFactors main instance, navigate to the user management tool.
Search for the integration system user and find the password within the user profile.
If required you can reset the password by searching *Reset User Password* in the search bar.
Note down the API password for this user.
# Authentication Flow 2: Linking your SAP instance library to an external content provider pushing data to your SAP instance.
### Finding the Learning Hub URL
Log into SAP SuccessFactors.
Type Learning Administration in the search bar and select the Learning Administration module.
Look in the browser address bar for the URL and save the address.
In this case: [https://sfcpart000906.scdemo.successfactors.com/](https://sfcpart000906.scdemo.successfactors.com/) is the access point.
Use this value as the `Learning Domain URL` value when connecting SAP SuccessFactors to StackOne.
### Finding Company ID
Select your profile image in the upper right-hand corner of the screen to open the dropdown modal
Within the modal that appears, you will see `Company ID`. Copy and note down this value.
## Additional Configuration Required For Creating Content via Open Content Network
### Create New Admin Role and User
#### Create Admin Role
To create an OCN admin profile in SuccessFactors, take the following steps:
Log in to the SuccessFactors Learning Administration environment and go to System Administration > Security > Role Management.
Click Add New.
Copy the value in the `API Server` column (remove the final forward-slash `/`). In this example, the value would be `https://apisalesdemo8.successfactors.com`.
Use this value as the `API Server` value when connecting SAP SuccessFactors to StackOne.
### Locating API password
In the SuccessFactors main instance, navigate to the user management tool.
Search for the integration system user and find the password within the user profile.
If required you can reset the password by searching *Reset User Password* in the search bar.
Note down the API password for this user.
# Authentication Flow 2: Linking your SAP instance library to an external content provider pushing data to your SAP instance.
### Finding the Learning Hub URL
Log into SAP SuccessFactors.
Type Learning Administration in the search bar and select the Learning Administration module.
Look in the browser address bar for the URL and save the address.
In this case: [https://sfcpart000906.scdemo.successfactors.com/](https://sfcpart000906.scdemo.successfactors.com/) is the access point.
Use this value as the `Learning Domain URL` value when connecting SAP SuccessFactors to StackOne.
### Finding Company ID
Select your profile image in the upper right-hand corner of the screen to open the dropdown modal
Within the modal that appears, you will see `Company ID`. Copy and note down this value.
## Additional Configuration Required For Creating Content via Open Content Network
### Create New Admin Role and User
#### Create Admin Role
To create an OCN admin profile in SuccessFactors, take the following steps:
Log in to the SuccessFactors Learning Administration environment and go to System Administration > Security > Role Management.
Click Add New.
 In the Role ID field, enter "OCN\_ADMIN".
Click Add.
In the Role ID field, enter "OCN\_ADMIN".
Click Add.
 Select Permissions, then click the link under Add Permissions to the Role.
 Under Add Permissions to Roles, enable Learning Activities, Search, and People Management.
 Set Status Restriction to "Active" for each activity under Permission Restrictions:
* Add Item
* Add Item Libraries
* Edit Item
* Edit item Libraries
* Edit Item Finance
* Edit Item Cost/Price
* Edit Item Custom Fields
* Edit Item State
* Open Content Network Import
* View Item
* View Item Libraries
* View Item Finance
* View Item Cost/Price
* View Item Custom Fields
* Search User
* Add History Record
Click Apply Changes.
Set Status Restriction to "Active" for each activity under Permission Restrictions:
* Add Item
* Add Item Libraries
* Edit Item
* Edit item Libraries
* Edit Item Finance
* Edit Item Cost/Price
* Edit Item Custom Fields
* Edit Item State
* Open Content Network Import
* View Item
* View Item Libraries
* View Item Finance
* View Item Cost/Price
* View Item Custom Fields
* Search User
* Add History Record
Click Apply Changes.
 #### Create Admin User
To create a system admin user in SuccessFactors, take the following steps:
Log in to the SuccessFactors Learning Administration environment and go to System Administration > Security > Administrators.
In the upper right-hand corner of the screen, click Add New.
In the Admin ID field, enter "OCNADMIN".
Enter a new password in the password fields.
**Take note of this username (AdminID) as this will be used to connect the account in the StackOne hub.**
Make sure the user is linked to an integration system user in the main SAP instance as we will require the api password for this user to access skills.
Click Add.
#### Create Admin User
To create a system admin user in SuccessFactors, take the following steps:
Log in to the SuccessFactors Learning Administration environment and go to System Administration > Security > Administrators.
In the upper right-hand corner of the screen, click Add New.
In the Admin ID field, enter "OCNADMIN".
Enter a new password in the password fields.
**Take note of this username (AdminID) as this will be used to connect the account in the StackOne hub.**
Make sure the user is linked to an integration system user in the main SAP instance as we will require the api password for this user to access skills.
Click Add.
 Select the Assigned Roles tab. If this integration is your first SuccessFactors instance, click Edit.
In the Role ID field, enter "OCN\_ADMIN", then click Add.
Select the Assigned Roles tab. If this integration is your first SuccessFactors instance, click Edit.
In the Role ID field, enter "OCN\_ADMIN", then click Add.
 ### Configure the OCN Property File
To configure the OCN property file, take the following steps:
In the SuccessFactors Learning Administration navigation menu, select System Administration > Configuration > System Configuration.
Find the Open Content Network option in the configuration file and select the Edit (pen) icon.
### Configure the OCN Property File
To configure the OCN property file, take the following steps:
In the SuccessFactors Learning Administration navigation menu, select System Administration > Configuration > System Configuration.
Find the Open Content Network option in the configuration file and select the Edit (pen) icon.
 Scroll to the bottom of the configuration file.
Copy and paste the values below into the configuration file:
providers\[ProviderName].enabled=true
providers\[ProviderName].name=ProviderName
providers\[ProviderName].label=label.u.ProviderName
providers\[ProviderName].baseLaunchUrl=[https://www.ProviderRootUrl.com](https://www.ProviderRootUrl.com)
providers\[ProviderName].pricingModel=
#### You can also set additional default values for Learning Items:
defaultValues.itemType\[default]=value
* Go to References > Learning Activities > Item Types > Click Search. Choose an item type.
* E.g. COURSE or ONLINE. You will need the Item Type ID of your chosen Item Type to replace the `value` above.
defaultValues.itemCompletionStatus\[default]=value
* Go to References > Manage Users Learning > Completion Status > Click Search.
* Choose Completion Status. E.g. COMPLETE or ONLINE-COMPL. You will need the Completion Status ID of your chosen Completion Status to replace the `value` above.
Completion Status MUST be linked to the Item Type. You may need to enable additional columns in the search results table in order to find the correct completion status.
defaultValues.domainID\[default]=value
* Go to System Admin > Security > Security Domains > Click Search.
* Choose the default security domain where the item should be created. This will control which admin users have access to the items created.
defaultValues.markCompleteOnLaunch\[default]=value
* This should be set to 'false' if the provider posts completion information back to SuccessFactors, items will not be marked as complete as soon as a user clicks on them.
defaultValues.autoImportOCNCourseEnabled\[default]=value
* This should be set to true either for all providers or for a specific provider, to automate the import of content. If set to true, the content will be automatically imported into SuccessFactors when it is published in the provider.
If you want any of the above configurations to be specific to a provider, you can add `provider_name` instead of `default` in the property name - e.g. defaultValues.itemType\[provider\_name]=value
### Set Up OCN Content Synchronization Automatic Process
To automate the OCN content sync process, take the following steps:
In the SuccessFactors Learning Administration navigation menu, select System Administration > Automatic Processes.
Select Open Content Network Content Synchronization.
Select the Schedule This Process check box.
Select the Daily radio button.
In the Time of Day field, specify a time outside of peak usage hours.
Click Apply Changes.
Scroll to the bottom of the configuration file.
Copy and paste the values below into the configuration file:
providers\[ProviderName].enabled=true
providers\[ProviderName].name=ProviderName
providers\[ProviderName].label=label.u.ProviderName
providers\[ProviderName].baseLaunchUrl=[https://www.ProviderRootUrl.com](https://www.ProviderRootUrl.com)
providers\[ProviderName].pricingModel=
#### You can also set additional default values for Learning Items:
defaultValues.itemType\[default]=value
* Go to References > Learning Activities > Item Types > Click Search. Choose an item type.
* E.g. COURSE or ONLINE. You will need the Item Type ID of your chosen Item Type to replace the `value` above.
defaultValues.itemCompletionStatus\[default]=value
* Go to References > Manage Users Learning > Completion Status > Click Search.
* Choose Completion Status. E.g. COMPLETE or ONLINE-COMPL. You will need the Completion Status ID of your chosen Completion Status to replace the `value` above.
Completion Status MUST be linked to the Item Type. You may need to enable additional columns in the search results table in order to find the correct completion status.
defaultValues.domainID\[default]=value
* Go to System Admin > Security > Security Domains > Click Search.
* Choose the default security domain where the item should be created. This will control which admin users have access to the items created.
defaultValues.markCompleteOnLaunch\[default]=value
* This should be set to 'false' if the provider posts completion information back to SuccessFactors, items will not be marked as complete as soon as a user clicks on them.
defaultValues.autoImportOCNCourseEnabled\[default]=value
* This should be set to true either for all providers or for a specific provider, to automate the import of content. If set to true, the content will be automatically imported into SuccessFactors when it is published in the provider.
If you want any of the above configurations to be specific to a provider, you can add `provider_name` instead of `default` in the property name - e.g. defaultValues.itemType\[provider\_name]=value
### Set Up OCN Content Synchronization Automatic Process
To automate the OCN content sync process, take the following steps:
In the SuccessFactors Learning Administration navigation menu, select System Administration > Automatic Processes.
Select Open Content Network Content Synchronization.
Select the Schedule This Process check box.
Select the Daily radio button.
In the Time of Day field, specify a time outside of peak usage hours.
Click Apply Changes.
 ### Importing Content
If you have enabled the autoImportOCNCourseEnabled property in the OCN property file, you can skip the manual import step below.
Once OCN content is being automatically made availble for import as per the steps above you may manually import the content into the system
In the SuccessFactors Learning Administration navigation menu, select Content > Open Content Network.
Select the content provider you wish to import content from and click `search`
### Importing Content
If you have enabled the autoImportOCNCourseEnabled property in the OCN property file, you can skip the manual import step below.
Once OCN content is being automatically made availble for import as per the steps above you may manually import the content into the system
In the SuccessFactors Learning Administration navigation menu, select Content > Open Content Network.
Select the content provider you wish to import content from and click `search`
 Tick the `import` box for all content you wish to import
Select `Import Selected`
Tick the `import` box for all content you wish to import
Select `Import Selected`
 Note: All content updates via the OCN Network will update the imported content once the synchronization process has run without the need for manual updarte or import.
### Create a Provider label
To create a LinkedIn Learning label, take the following steps:
In the SuccessFactors Learning Administration navigation menu, select References > Manage Labels > Labels.
Click Add New.
In Label Type, enter "LABEL" and click Next.
Note: All content updates via the OCN Network will update the imported content once the synchronization process has run without the need for manual updarte or import.
### Create a Provider label
To create a LinkedIn Learning label, take the following steps:
In the SuccessFactors Learning Administration navigation menu, select References > Manage Labels > Labels.
Click Add New.
In Label Type, enter "LABEL" and click Next.
 In Label ID, type "ProviderLinkedInLearning".
In Description, type "LinkedIn Learning Label".
In Use By drop down, select "Both".
Select Assign to All Locales.
Click Add.
In Label ID, type "ProviderLinkedInLearning".
In Description, type "LinkedIn Learning Label".
In Use By drop down, select "Both".
Select Assign to All Locales.
Click Add.
 Select the Locales tab.
To add a locale to the LinkedIn Learning label, enter the locale (i.e., "Japanese") in the Active Locale ID field and "LinkedIn Learning" in the Label Value field, then click Add.
For each Active Locale ID, enter "LinkedIn Learning" (if the Label Value field is not already populated).
Click Apply Changes.
Select the Locales tab.
To add a locale to the LinkedIn Learning label, enter the locale (i.e., "Japanese") in the Active Locale ID field and "LinkedIn Learning" in the Label Value field, then click Add.
For each Active Locale ID, enter "LinkedIn Learning" (if the Label Value field is not already populated).
Click Apply Changes.
 ### Note Content Provider Name
This will be used when connecting the account in the StackOne hub. Ensure this matches the provider name which has been used in the OCN property file.
### SSO Configuration
Proper SSO (Single Sign-On) configuration is essential for the SAP SuccessFactors integration to work correctly. The configuration ensures that users are properly identified and matched between your platform and SAP SuccessFactors.
#### Configuration Options
The SSO configuration should use the following approach:
##### Custom Field Configuration
Configure a custom field called `lms_user_id` and set it to the **UserID** field value.
Ensure the `lms_user_id` custom field is properly populated and accessible through the SSO configuration.
#### Important Notes
Correct SSO configuration is **essential** for ensuring the integration works as expected. Incorrect configuration may result in:
* Users not being properly identified
* Learning records not being correctly attributed
* Authentication failures
**Customer Responsibility**: You should work closely with your content provider to ensure the SSO configuration follows one of the recommended approaches above. The content provider should validate that the configuration meets the integration requirements.
## Additional Configuration if syncing Skills and Competencies via API endpoints (Optional)
### Locating API Server
SAP uses multiple API server addresses. You will need to look up the API server that corresponds to your tenant domain on this [table](https://help.sap.com/docs/SAP_SUCCESSFACTORS_PLATFORM/d599f15995d348a1b45ba5603e2aba9b/af2b8d5437494b12be88fe374eba75b6.html) under the `API Server` column.
For example, if your domain was `https://pmsalesdemo8.successfactors.com/` you would search for `salesdemo8` in the table. If the server is not listed, you may be able to find it by searching online or contacting your provider for support.
Copy the value in the `API Server` column (remove the final forward-slash `/`). In this example, the value would be `https://apisalesdemo8.successfactors.com`.
Use this value as the `API Server` value when connecting SAP SuccessFactors to StackOne.
### Locating API password
In the SuccessFactors main instance, navigate to the user management tool.
Search for the integration system user and find the password within the user profile.
If required you can reset the password by searching *Reset User Password* in the search bar.
Note down the API password for this user.
# Authentication Flow 3: Platform Token Server Authentication (Write-Only)
This authentication method is **write-only** and is used when you need to write data to your SAP SuccessFactors instance using OAuth2 with X.509 certificates.
## Locating API Server
SAP uses multiple API server addresses. You will need to look up the API server that corresponds to your tenant domain on this [table](https://help.sap.com/docs/SAP_SUCCESSFACTORS_PLATFORM/d599f15995d348a1b45ba5603e2aba9b/af2b8d5437494b12be88fe374eba75b6.html) under the `API Server` column.
For example, if your domain was `https://pmsalesdemo8.successfactors.com/` you would search for `salesdemo8` in the table.
Copy the value in the `API Server` column (remove the final forward-slash `/`). In this example, the value would be `https://apisalesdemo8.successfactors.com`.
Use this value as the `API Server` value when connecting SAP SuccessFactors to StackOne.
### Finding the Learning Server URL
Log into SAP SuccessFactors.
Type Learning Administration in the search bar and select the Learning Administration module.
Look in the browser address bar for the URL and save the address.
In this case: [https://sfcpart000906.scdemo.successfactors.com/](https://sfcpart000906.scdemo.successfactors.com/) is the access point.
Use this value as the `Learning Domain URL` value when connecting SAP SuccessFactors to StackOne.
## Finding Username
Login to SAP SuccessFactors.
Select your profile image in the upper right-hand corner of the screen.
Your username is the value in parenthesis. Copy this value and note it as your `Username`.
### Note Content Provider Name
This will be used when connecting the account in the StackOne hub. Ensure this matches the provider name which has been used in the OCN property file.
### SSO Configuration
Proper SSO (Single Sign-On) configuration is essential for the SAP SuccessFactors integration to work correctly. The configuration ensures that users are properly identified and matched between your platform and SAP SuccessFactors.
#### Configuration Options
The SSO configuration should use the following approach:
##### Custom Field Configuration
Configure a custom field called `lms_user_id` and set it to the **UserID** field value.
Ensure the `lms_user_id` custom field is properly populated and accessible through the SSO configuration.
#### Important Notes
Correct SSO configuration is **essential** for ensuring the integration works as expected. Incorrect configuration may result in:
* Users not being properly identified
* Learning records not being correctly attributed
* Authentication failures
**Customer Responsibility**: You should work closely with your content provider to ensure the SSO configuration follows one of the recommended approaches above. The content provider should validate that the configuration meets the integration requirements.
## Additional Configuration if syncing Skills and Competencies via API endpoints (Optional)
### Locating API Server
SAP uses multiple API server addresses. You will need to look up the API server that corresponds to your tenant domain on this [table](https://help.sap.com/docs/SAP_SUCCESSFACTORS_PLATFORM/d599f15995d348a1b45ba5603e2aba9b/af2b8d5437494b12be88fe374eba75b6.html) under the `API Server` column.
For example, if your domain was `https://pmsalesdemo8.successfactors.com/` you would search for `salesdemo8` in the table. If the server is not listed, you may be able to find it by searching online or contacting your provider for support.
Copy the value in the `API Server` column (remove the final forward-slash `/`). In this example, the value would be `https://apisalesdemo8.successfactors.com`.
Use this value as the `API Server` value when connecting SAP SuccessFactors to StackOne.
### Locating API password
In the SuccessFactors main instance, navigate to the user management tool.
Search for the integration system user and find the password within the user profile.
If required you can reset the password by searching *Reset User Password* in the search bar.
Note down the API password for this user.
# Authentication Flow 3: Platform Token Server Authentication (Write-Only)
This authentication method is **write-only** and is used when you need to write data to your SAP SuccessFactors instance using OAuth2 with X.509 certificates.
## Locating API Server
SAP uses multiple API server addresses. You will need to look up the API server that corresponds to your tenant domain on this [table](https://help.sap.com/docs/SAP_SUCCESSFACTORS_PLATFORM/d599f15995d348a1b45ba5603e2aba9b/af2b8d5437494b12be88fe374eba75b6.html) under the `API Server` column.
For example, if your domain was `https://pmsalesdemo8.successfactors.com/` you would search for `salesdemo8` in the table.
Copy the value in the `API Server` column (remove the final forward-slash `/`). In this example, the value would be `https://apisalesdemo8.successfactors.com`.
Use this value as the `API Server` value when connecting SAP SuccessFactors to StackOne.
### Finding the Learning Server URL
Log into SAP SuccessFactors.
Type Learning Administration in the search bar and select the Learning Administration module.
Look in the browser address bar for the URL and save the address.
In this case: [https://sfcpart000906.scdemo.successfactors.com/](https://sfcpart000906.scdemo.successfactors.com/) is the access point.
Use this value as the `Learning Domain URL` value when connecting SAP SuccessFactors to StackOne.
## Finding Username
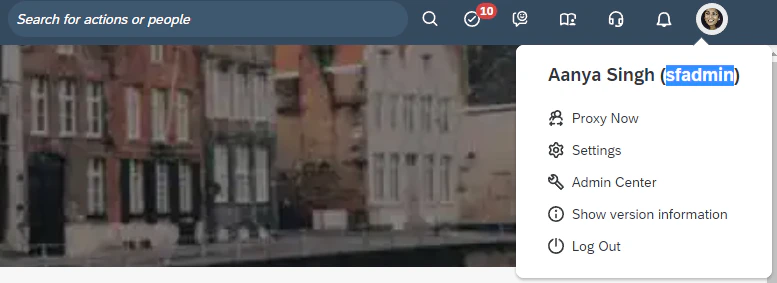
Login to SAP SuccessFactors.
Select your profile image in the upper right-hand corner of the screen.
Your username is the value in parenthesis. Copy this value and note it as your `Username`.
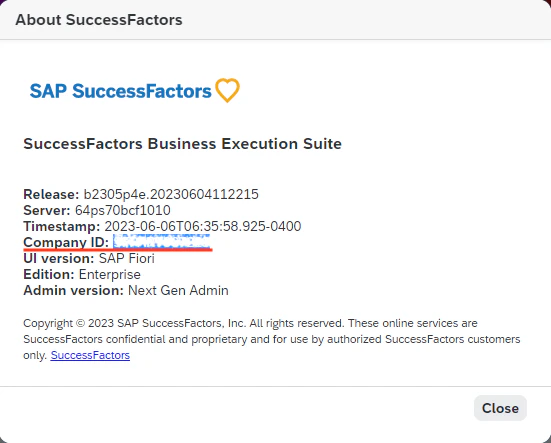
 ## Finding Company ID
Within the same dropdown from the previous step, select the Show version information option.
Within the modal that appears, you will see `Company ID`. Copy and note down this value.
## Registering a new Client Application
In the upper right search bar, search for Manage OAuth2 Client Applications and select the option under Actions.
## Finding Company ID
Within the same dropdown from the previous step, select the Show version information option.
Within the modal that appears, you will see `Company ID`. Copy and note down this value.
## Registering a new Client Application
In the upper right search bar, search for Manage OAuth2 Client Applications and select the option under Actions.
 Select Register Client Application.
Enter an Application Name, e.g. `StackOne`.
Enter an Application URL. Note: This can be any URL and is not used in this integration.
Select Register Client Application.
Enter an Application Name, e.g. `StackOne`.
Enter an Application URL. Note: This can be any URL and is not used in this integration.
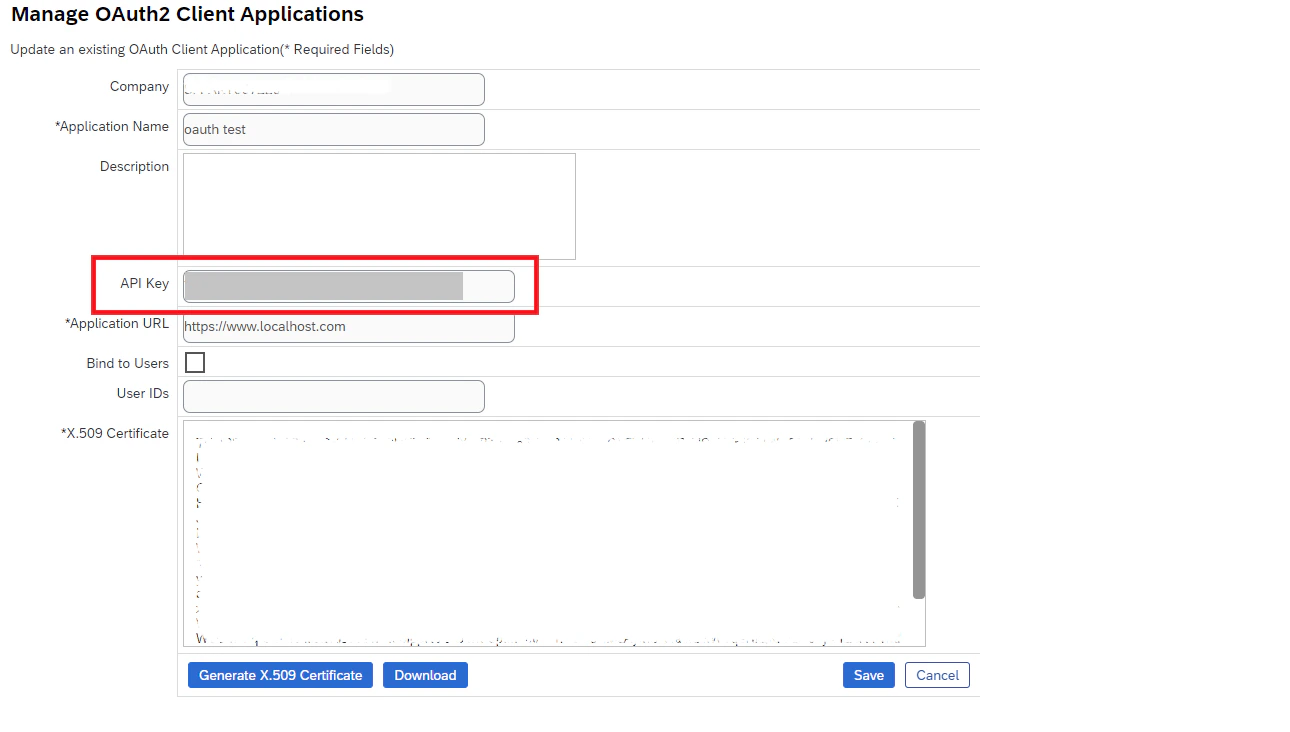
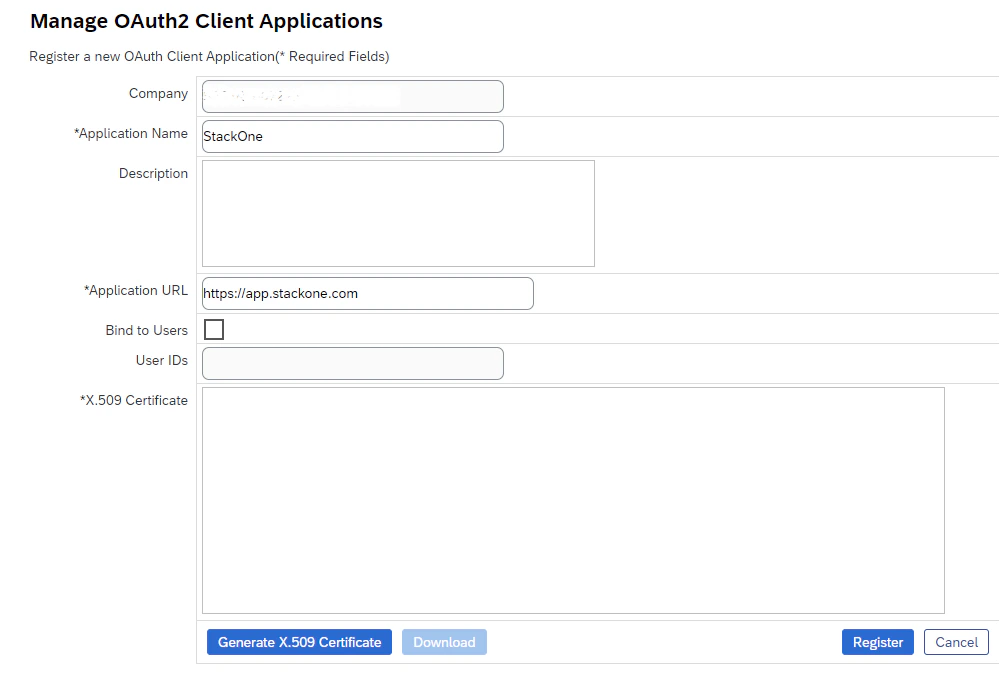 ## Generating X.509 Certificate
Press the Generate X.509 Certificate button.
Enter any Common Name(CN) for the certificate, e.g. `StackOne OAuth2`.
## Generating X.509 Certificate
Press the Generate X.509 Certificate button.
Enter any Common Name(CN) for the certificate, e.g. `StackOne OAuth2`.
 Press Generate.
Copy the value inside the X.509 Certificate section.
Press Generate.
Copy the value inside the X.509 Certificate section.
 ## Downloading Private Key
Press the Download button.
❗Caution: The downloaded file contains your private key. This should be handled securely, and this local file should be deleted after your account has been linked.
Select and copy the long string of characters between -----BEGIN ENCRYPTED PRIVATE KEY----- and -----END ENCRYPTED PRIVATE KEY-----
This value is your Private Key. Please keep it safe!
## Finding API Key
Your API Key is displayed on the Manage OAuth2 Client Applications screen above your X.509 Certificate.
## Downloading Private Key
Press the Download button.
❗Caution: The downloaded file contains your private key. This should be handled securely, and this local file should be deleted after your account has been linked.
Select and copy the long string of characters between -----BEGIN ENCRYPTED PRIVATE KEY----- and -----END ENCRYPTED PRIVATE KEY-----
This value is your Private Key. Please keep it safe!
## Finding API Key
Your API Key is displayed on the Manage OAuth2 Client Applications screen above your X.509 Certificate.
 ## Locating Learning Content Provider
Identify the Learning Content Provider name that will be used when connecting the account:
* If you previously configured OCN in Authentication Flow 2, use the provider name from your OCN property file.
* If you have not configured OCN (for example, you are only using Authentication Flow 3), use the provider name as it appears in SAP SuccessFactors Learning or as provided by your content provider.
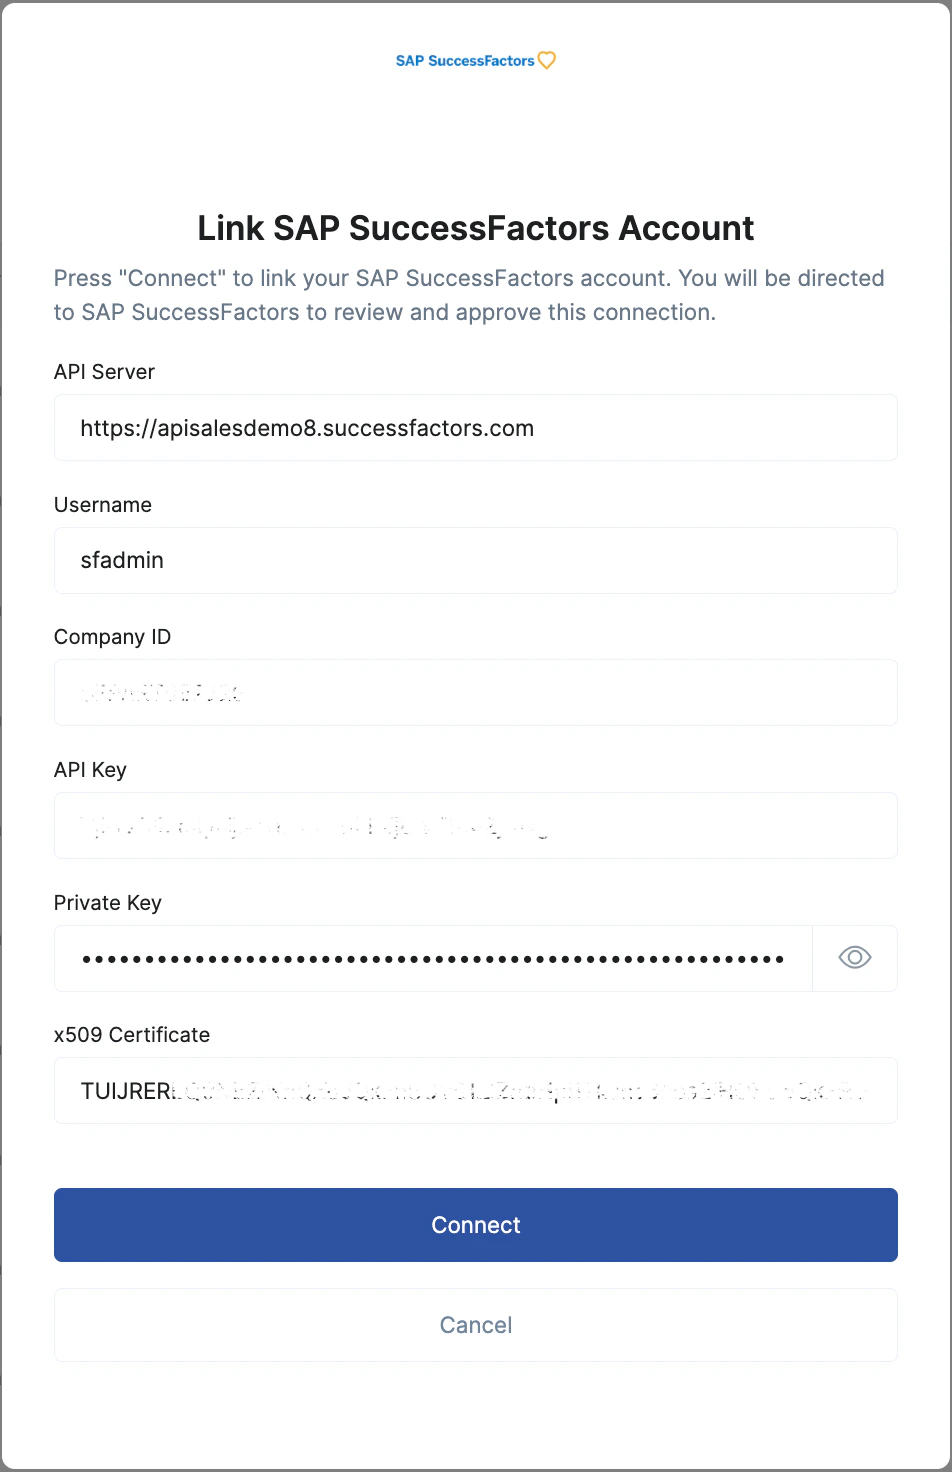
## Connecting Your Account
Upon reaching the Link Account page, enter the gathered details and proceed by clicking the `Connect` button.
## Locating Learning Content Provider
Identify the Learning Content Provider name that will be used when connecting the account:
* If you previously configured OCN in Authentication Flow 2, use the provider name from your OCN property file.
* If you have not configured OCN (for example, you are only using Authentication Flow 3), use the provider name as it appears in SAP SuccessFactors Learning or as provided by your content provider.
## Connecting Your Account
Upon reaching the Link Account page, enter the gathered details and proceed by clicking the `Connect` button.
 Note: The integration may take up to 15 minutes to initially authenticate once the account has been connected. In the meantime, requests will return a 401: Unauthorized response.
## Linking your Account (Flows 1 & 2)
In the modal, enter the gathered details and proceed by clicking the `Connect` button.
Note: The integration may take up to 15 minutes to initially authenticate once the account has been connected. In the meantime, requests will return a 401: Unauthorized response.
## Linking your Account (Flows 1 & 2)
In the modal, enter the gathered details and proceed by clicking the `Connect` button.


Congratulations, you're all set! If you face any issues with the steps mentioned above,
please contact us by emailing [integrations@stackone.com](mailto:integrations@stackone.com). We're always here to assist you!
### Useful Links
[https://api.sap.com/products/SAPSuccessFactors/apis/all](https://api.sap.com/products/SAPSuccessFactors/apis/all)