> ## Documentation Index
> Fetch the complete documentation index at: https://stackone-hub-docs-confluence-api-token-update.mintlify.site/llms.txt
> Use this file to discover all available pages before exploring further.
# SAP SuccessFactors Application Custom Fields
> To create and view application custom fields in SAP SuccessFactors, follow these steps
This guidance assumes that you have admin privileges for your SAP SuccessFactors account.
## Configure Application Custom Fields
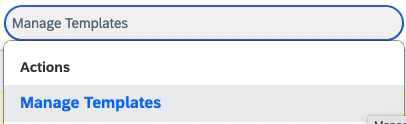
Type *Manage Templates* into the search bar and select it from the results
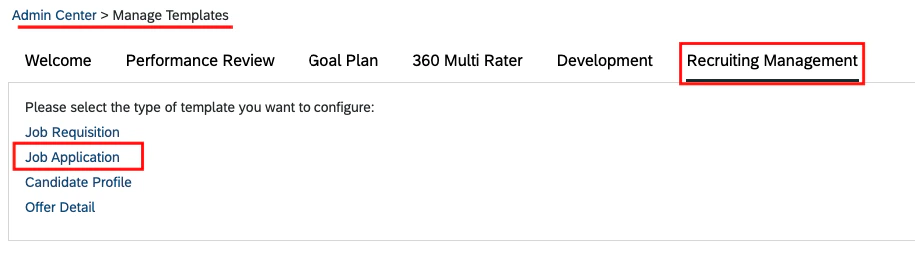
 Go to the *Recruiting Management* tab, select *Job Application*, and choose the default active template to which you want to add a custom fields
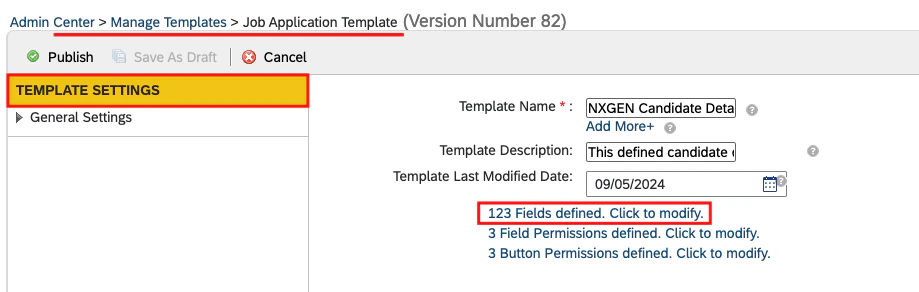
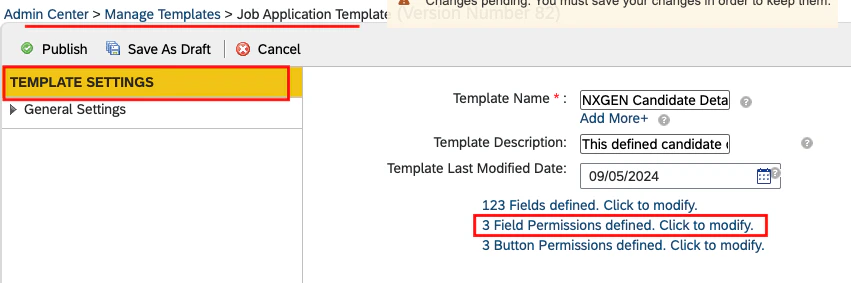
 Click on `Fields defined`
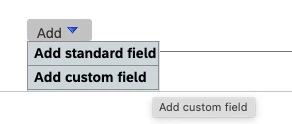
 Click the `Add` button and select `Add Custom Field` to add a new custom field block
 Enter the following field values:
* **Field ID:** Enter the ID of the field.
* **Field Type:** Select the type of field (e.g., text).
* **Field Label:** Enter a label for the field.
* **Field Description:** Provide a description for the field.
You can select other field's values either as shown in the image or according to your preferences.
Enter the following field values:
* **Field ID:** Enter the ID of the field.
* **Field Type:** Select the type of field (e.g., text).
* **Field Label:** Enter a label for the field.
* **Field Description:** Provide a description for the field.
You can select other field's values either as shown in the image or according to your preferences.
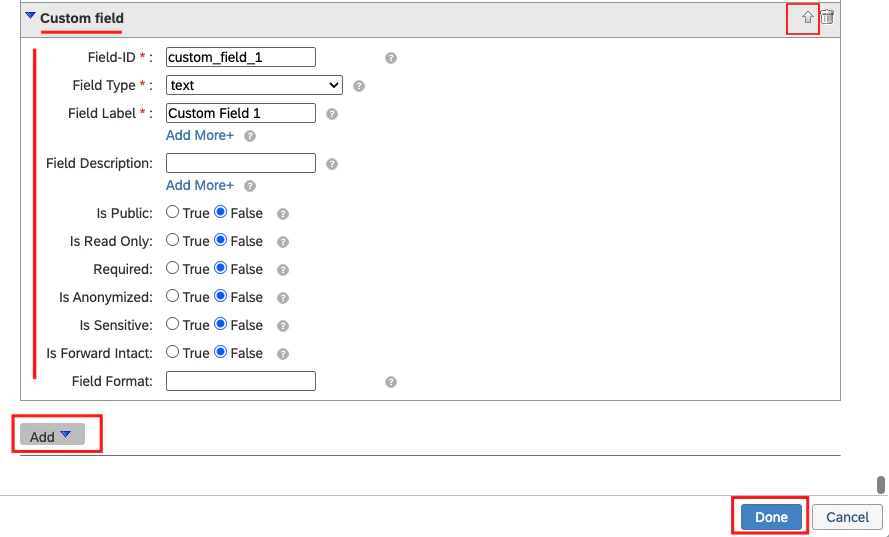 Click on `Done` to save your changes.
You can set the position of the custom fields using the top and bottom arrows.
Click on `Fields Permissions defined`
Click on `Done` to save your changes.
You can set the position of the custom fields using the top and bottom arrows.
Click on `Fields Permissions defined`
 Enter the following field values:
* **Field Permission Description:** You can enter any description as this field allows free text.
* **Field Permission Type:** Select `Write Permission`.
* **Field Permission Role Name:** Choose the role for which you want to make this custom field visible.
* **Field Reference ID:** Select the custom field ID that you added in the step above.
You can choose other field's values based on your preferences.
Enter the following field values:
* **Field Permission Description:** You can enter any description as this field allows free text.
* **Field Permission Type:** Select `Write Permission`.
* **Field Permission Role Name:** Choose the role for which you want to make this custom field visible.
* **Field Reference ID:** Select the custom field ID that you added in the step above.
You can choose other field's values based on your preferences.
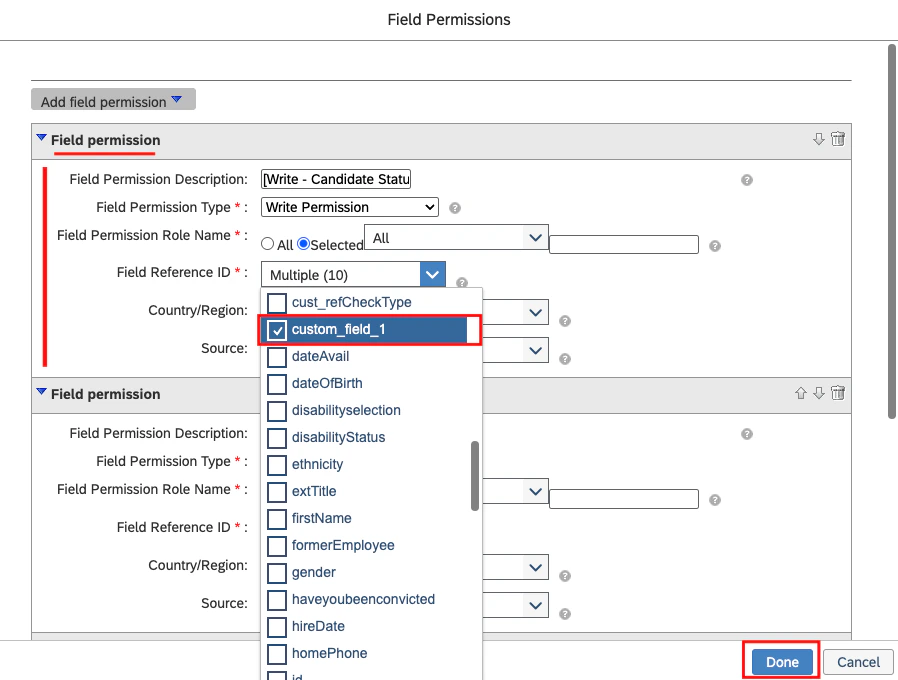 Click on `Done` to save your changes.
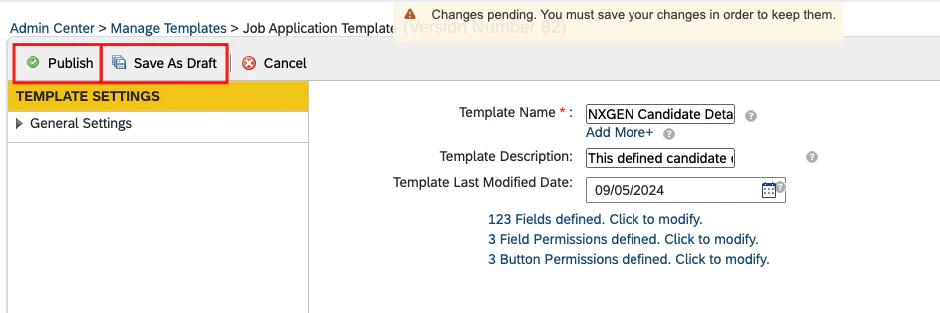
To save your changes, click on `Save & Draft` and then select `Publish`.
Changes will only be published if they do not contain any validation errors.
Click on `Done` to save your changes.
To save your changes, click on `Save & Draft` and then select `Publish`.
Changes will only be published if they do not contain any validation errors.
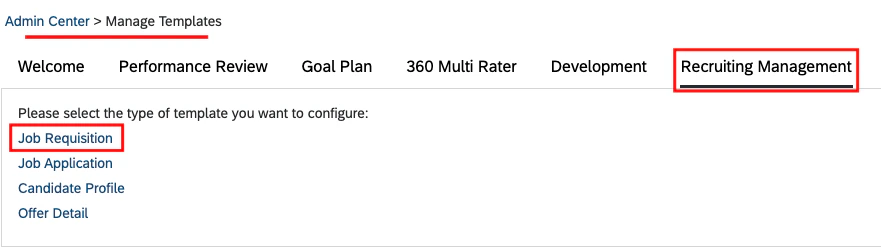
 ## Configure Job Requisition Template to Add Custom Fields
Type *Manage Templates* into the search bar and select it from the results
Navigate to *Recruiting Management* tab > *Job Requisition*,
## Configure Job Requisition Template to Add Custom Fields
Type *Manage Templates* into the search bar and select it from the results
Navigate to *Recruiting Management* tab > *Job Requisition*,
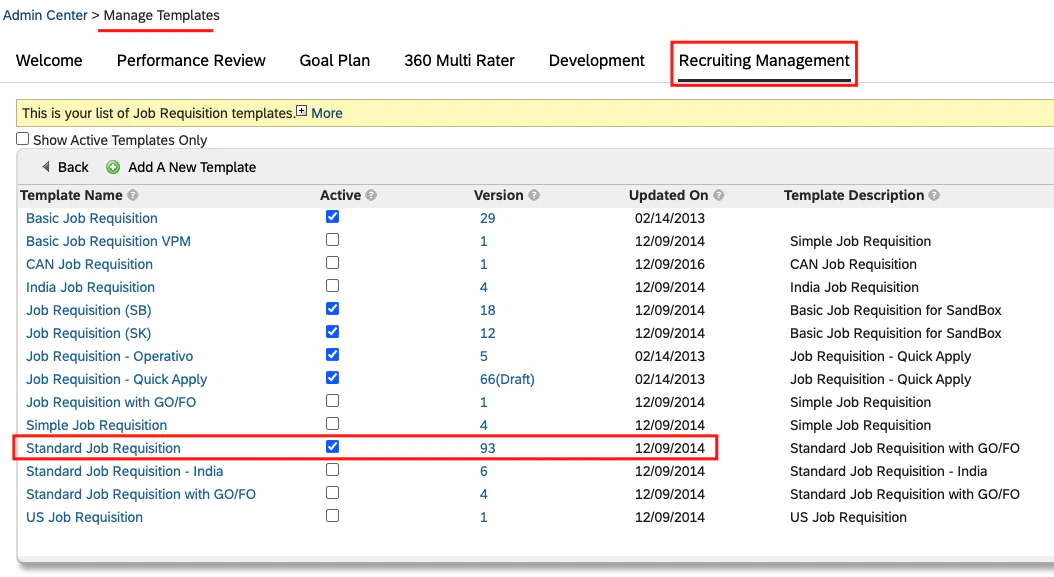
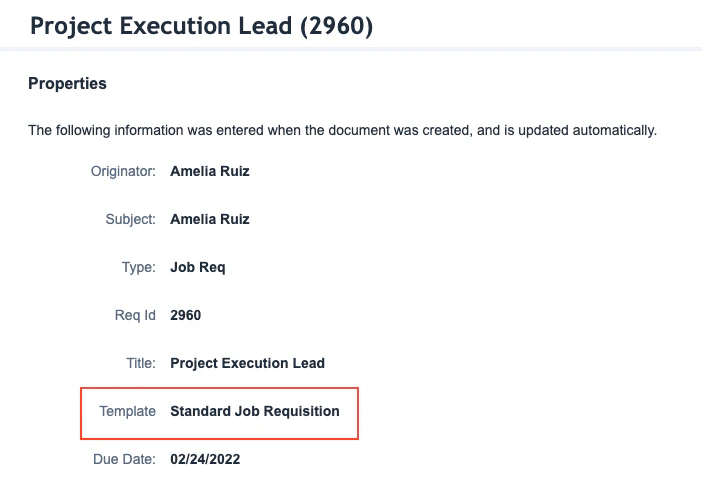
 Select the Job Requisition template to display the application custom fields, such as `Standard Job Requisition`
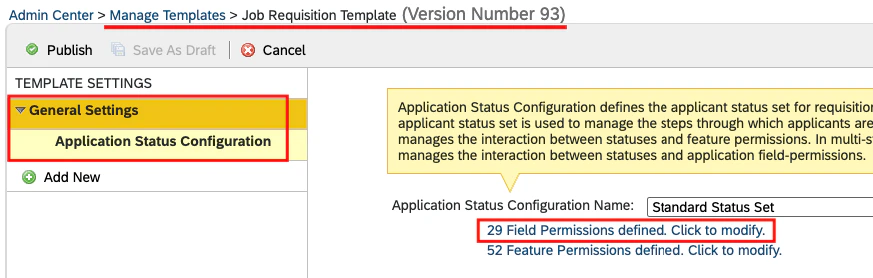
 Click on `General Settings` > `Application Status Configuration` > `Field Permissions defined`
 Click on the `Add` button to add a new field permission block, then Enter the following field values:
* **Field Permission Description:** You can enter any description as this field allows free text.
* **Field Permission Type:** Select `Read Permission`.
* **Field Permission Role Name:** Choose the permission role for which the fields will be displayed.
* **Field Reference ID:** Select the custom field ID you added in the previous step 3 under "Configure Application Custom Fields" process that needs to be displayed on the UI.
* **Required Fields:** Choose the fields that you want to make mandatory.
* **Field Permission Status:** Select the application status indicating when the fields should be displayed.
Click on the `Add` button to add a new field permission block, then Enter the following field values:
* **Field Permission Description:** You can enter any description as this field allows free text.
* **Field Permission Type:** Select `Read Permission`.
* **Field Permission Role Name:** Choose the permission role for which the fields will be displayed.
* **Field Reference ID:** Select the custom field ID you added in the previous step 3 under "Configure Application Custom Fields" process that needs to be displayed on the UI.
* **Required Fields:** Choose the fields that you want to make mandatory.
* **Field Permission Status:** Select the application status indicating when the fields should be displayed.
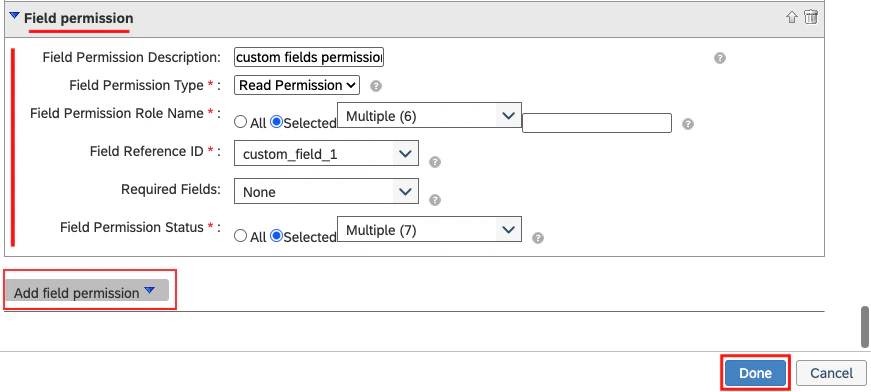 Click on `Done` to save your changes.
Click on `Save & Draft`, and then click `Publish` to save your changes.
Changes will only be published if they do not contain any validation errors.
Click on `Done` to save your changes.
Click on `Save & Draft`, and then click `Publish` to save your changes.
Changes will only be published if they do not contain any validation errors.
 ## View Application Custom Fields in the Job Application
The custom fields will be displayed for applications associated with job requisition templates for which custom fields are configured.
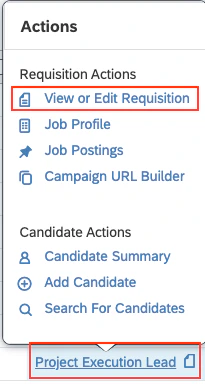
Navigate to *Job Requisition*, hover over the specific requisition title to open the Actions menu and then select `View or Edit Requisition`.
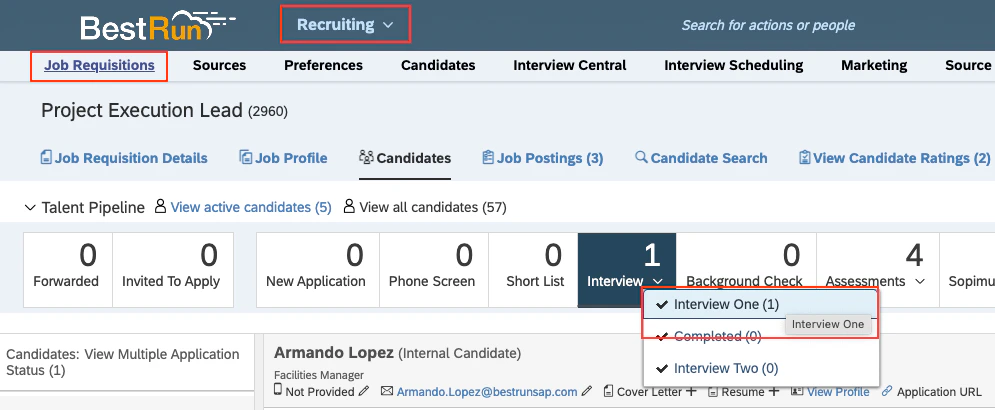
Go to the *Recruiting* and select any specific job requisition.
## View Application Custom Fields in the Job Application
The custom fields will be displayed for applications associated with job requisition templates for which custom fields are configured.
Navigate to *Job Requisition*, hover over the specific requisition title to open the Actions menu and then select `View or Edit Requisition`.
Go to the *Recruiting* and select any specific job requisition.
 Click on the `i` icon to view the Job Requisition Template.
 Access the candidate's job application and update their application status as you have configured in the step 3 in the "Configure Job Requisition Template to Add Custom Fields" process.
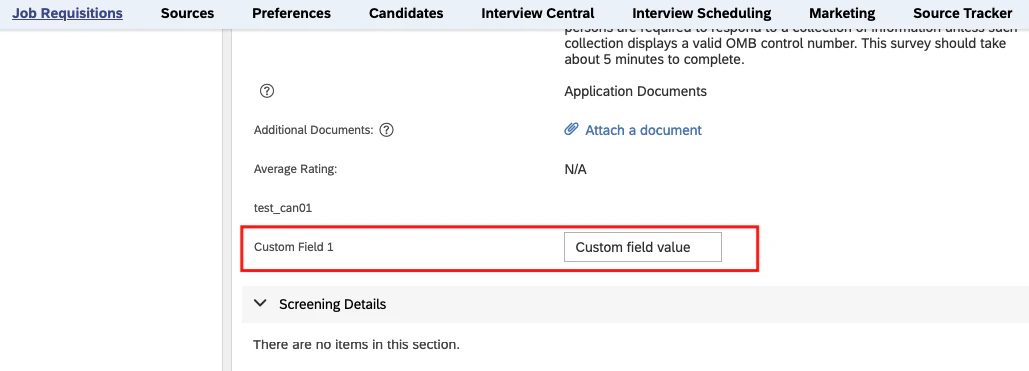
 The newly created custom fields will be visible in the job application
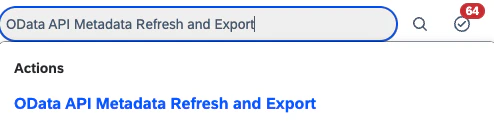
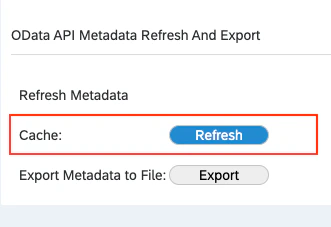
Navigate to *Admin Center* and search for `OData API Metadata Refresh and Export`
The newly created custom fields will be visible in the job application
Navigate to *Admin Center* and search for `OData API Metadata Refresh and Export`
 Click on the `Refresh` button next to Cache.
 To adjust the placement of custom fields, refer to step 3 in the "Configure Application Custom Fields" process.
Congratulations, you're all set! If you face any issues with the steps mentioned above,
please contact us by emailing [integrations@stackone.com](mailto:integrations@stackone.com). We're always here to assist you!