> ## Documentation Index
> Fetch the complete documentation index at: https://stackone-hub-docs-confluence-api-token-update.mintlify.site/llms.txt
> Use this file to discover all available pages before exploring further.

# Workday Employee Custom Field

> To create employee custom field in Workday, follow these steps

<Warning>
  This guidance assumes that you have admin privileges for your Workday account.
</Warning>

## Create Workday Employee Custom Field

<Steps>
  <Step title="Search for 'Create Custom Object'">
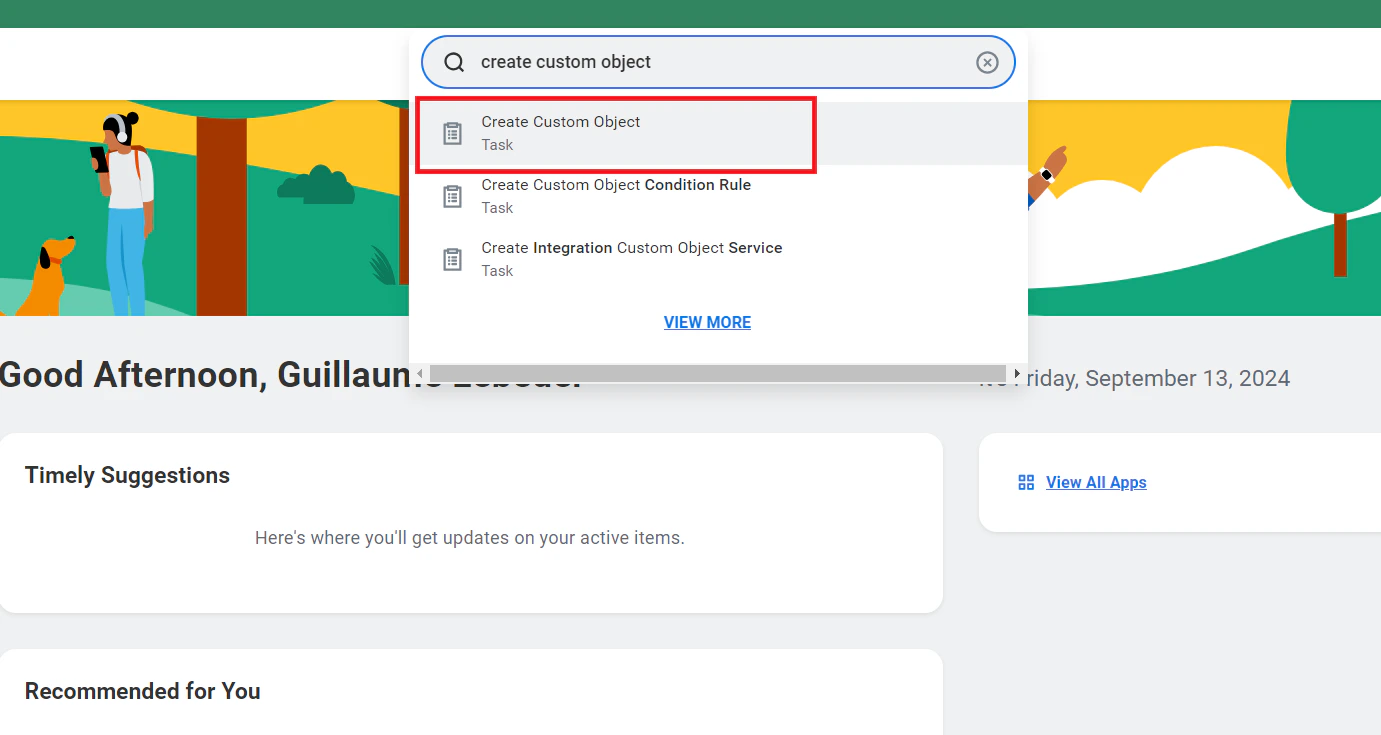
    Search for <b>Create Custom Object</b> in the search bar and select it.

    <Frame>
      <img className="rounded-md" style={{ margin: '0 auto', border: '1px solid #efefef' }} alt="Search Create Custom Object" src="https://mintcdn.com/stackone-hub-docs-confluence-api-token-update/w__eN0U5iLwN8ehP/images/workday/custom-field/custom-field-01.png?fit=max&auto=format&n=w__eN0U5iLwN8ehP&q=85&s=22a6f1f9d6645642f3510062953859f0" width="1381" height="735" data-path="images/workday/custom-field/custom-field-01.png" />
    </Frame>
  </Step>

  <Step title="Create Custom Object">
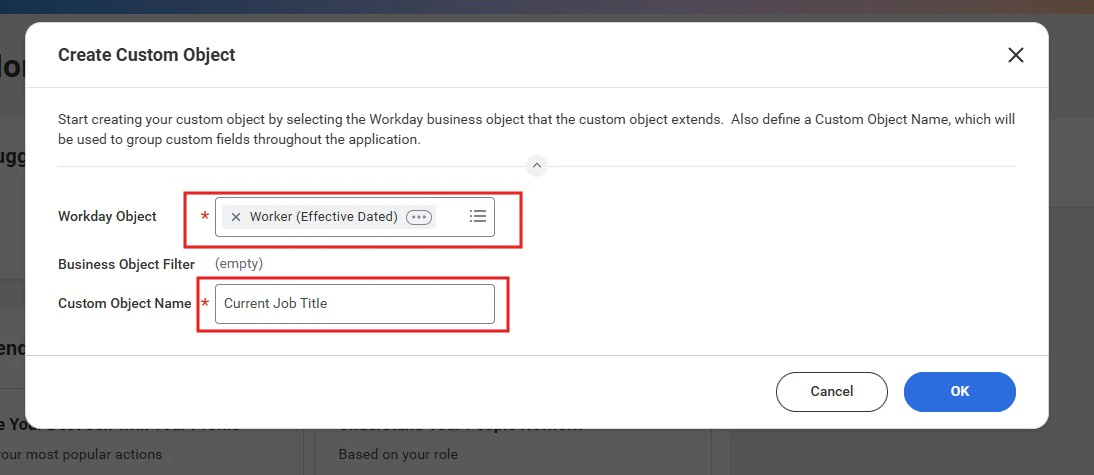
    Select <b>Worker (Effective Dated)</b> in Workday Object.<br /> Enter a name for the custom object and click <b>OK</b>

    <Frame>
      <img className="rounded-md" style={{ margin: '0 auto', border: '1px solid #efefef' }} alt="Create Custom Object" src="https://mintcdn.com/stackone-hub-docs-confluence-api-token-update/w__eN0U5iLwN8ehP/images/workday/custom-field/custom-field-25.jpg?fit=max&auto=format&n=w__eN0U5iLwN8ehP&q=85&s=5e6e8d58b1f485c1928db204c9c45df8" width="1094" height="475" data-path="images/workday/custom-field/custom-field-25.jpg" />
    </Frame>
  </Step>

  <Step title="Click 'Field Definitions'">
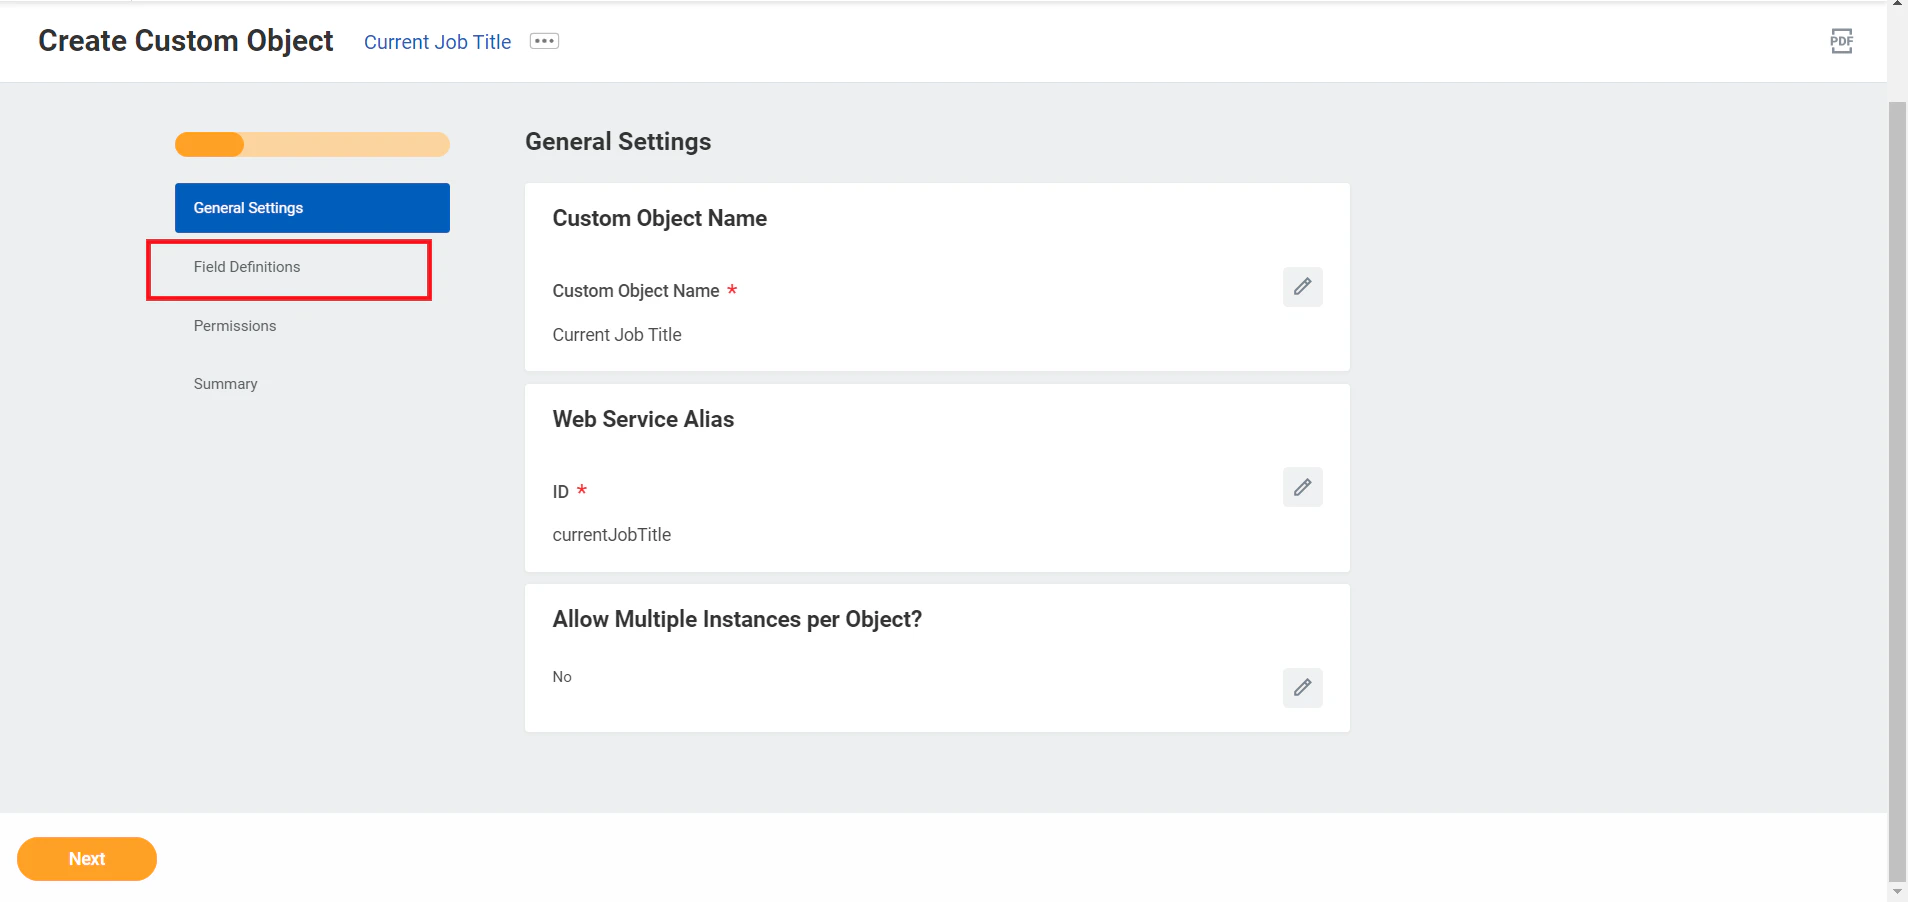
    Click the <b>Field Definitions</b> tab in the sidebar.

    <Frame>
      <img className="rounded-md" style={{ margin: '0 auto', border: '1px solid #efefef' }} alt="Click Field Definitions" src="https://mintcdn.com/stackone-hub-docs-confluence-api-token-update/w__eN0U5iLwN8ehP/images/workday/custom-field/custom-field-03.png?fit=max&auto=format&n=w__eN0U5iLwN8ehP&q=85&s=0a3db1f12b1438c13e3a03ea31676423" width="1908" height="902" data-path="images/workday/custom-field/custom-field-03.png" />
    </Frame>
  </Step>

  <Step title="Click 'Add' button">
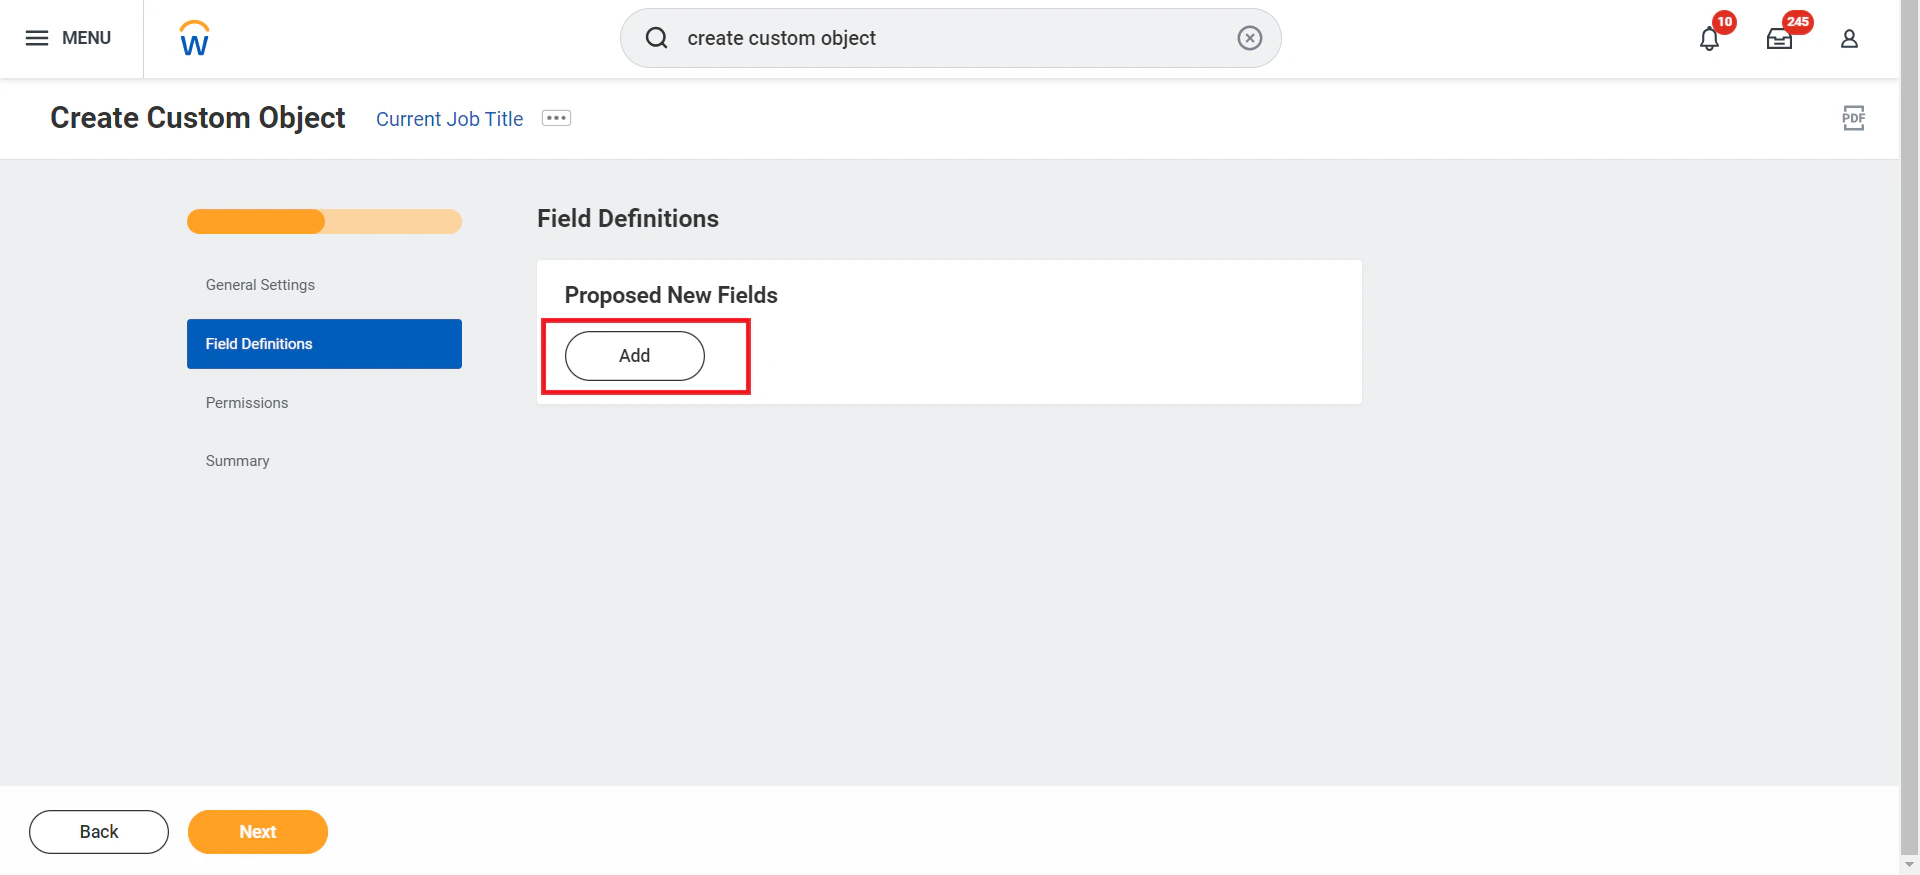
    Click the <b>Add</b> button in Proposed New Fields.

    <Frame>
      <img className="rounded-md" style={{ margin: '0 auto', border: '1px solid #efefef' }} alt="Click Add button" src="https://mintcdn.com/stackone-hub-docs-confluence-api-token-update/w__eN0U5iLwN8ehP/images/workday/custom-field/custom-field-04.png?fit=max&auto=format&n=w__eN0U5iLwN8ehP&q=85&s=441ab771e9fce370bcdc5ddcdc8418c4" width="1920" height="875" data-path="images/workday/custom-field/custom-field-04.png" />
    </Frame>
  </Step>

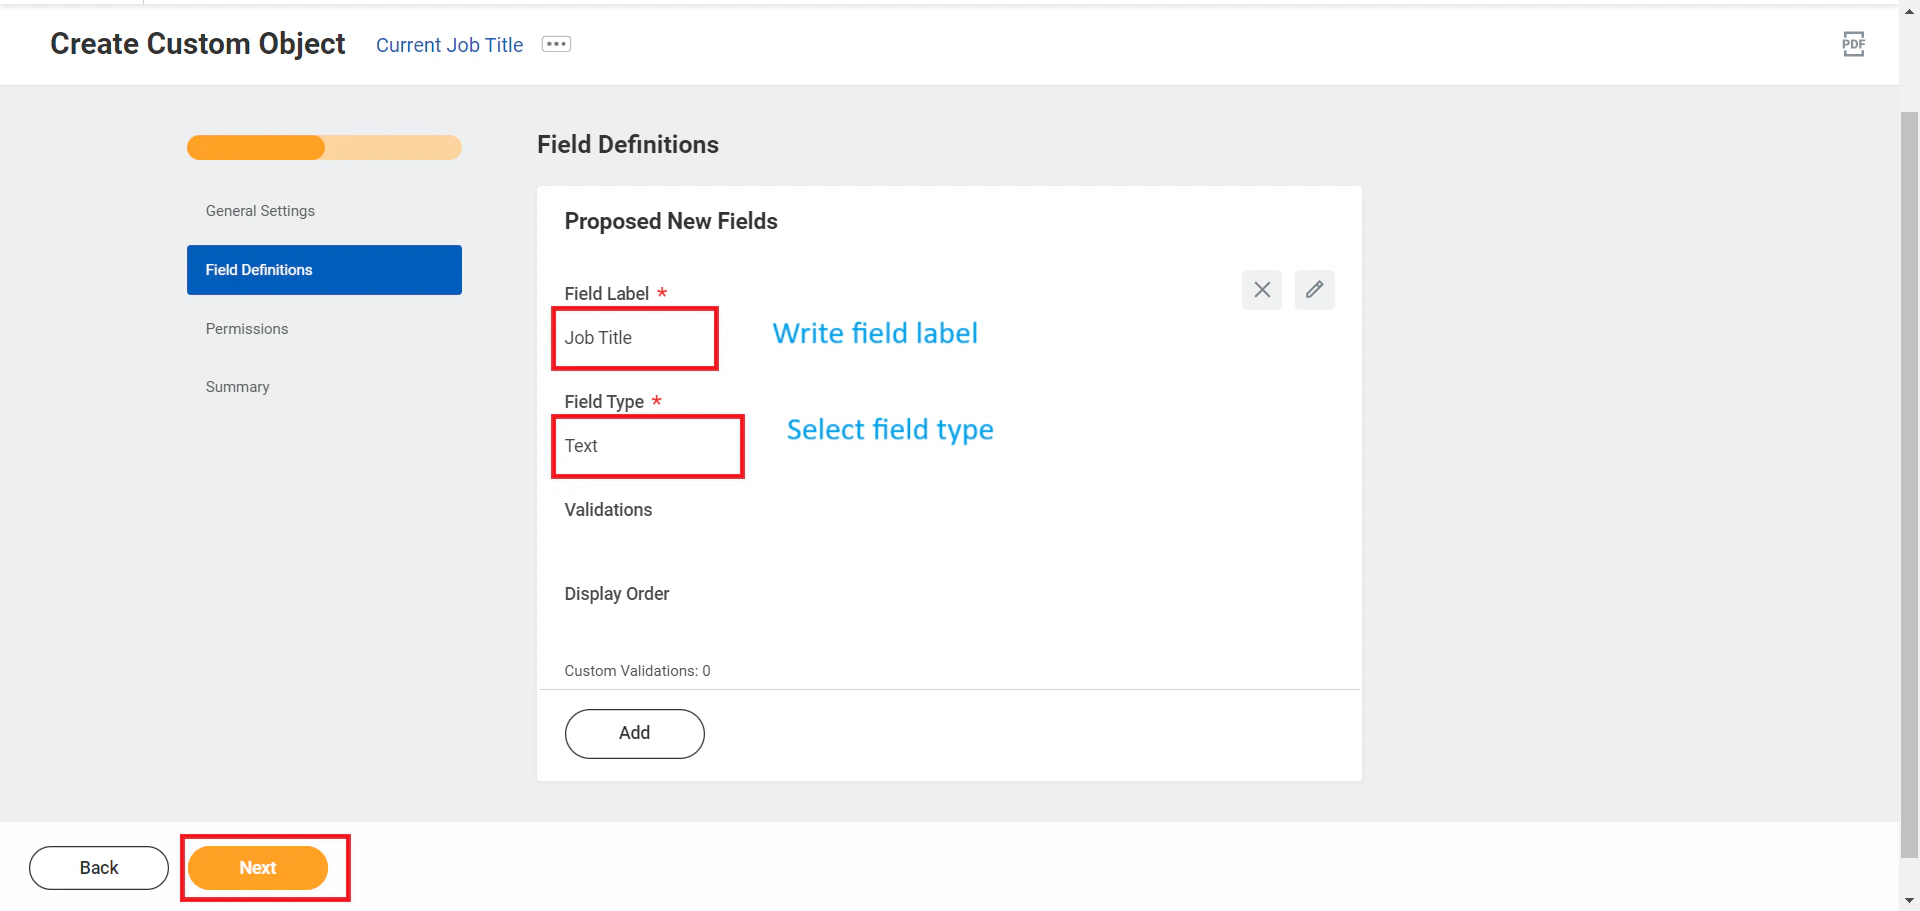
  <Step title="Enter Label & Field Type">
    Enter a label for the field, select a field type from the dropdown menu, and click <b>Next</b>

    <Frame>
      <img className="rounded-md" style={{ margin: '0 auto', border: '1px solid #efefef' }} alt="Enter Label & Field Type" src="https://mintcdn.com/stackone-hub-docs-confluence-api-token-update/w__eN0U5iLwN8ehP/images/workday/custom-field/custom-field-05.png?fit=max&auto=format&n=w__eN0U5iLwN8ehP&q=85&s=f060df0b136f394ef52656862d42d326" width="1920" height="911" data-path="images/workday/custom-field/custom-field-05.png" />
    </Frame>
  </Step>

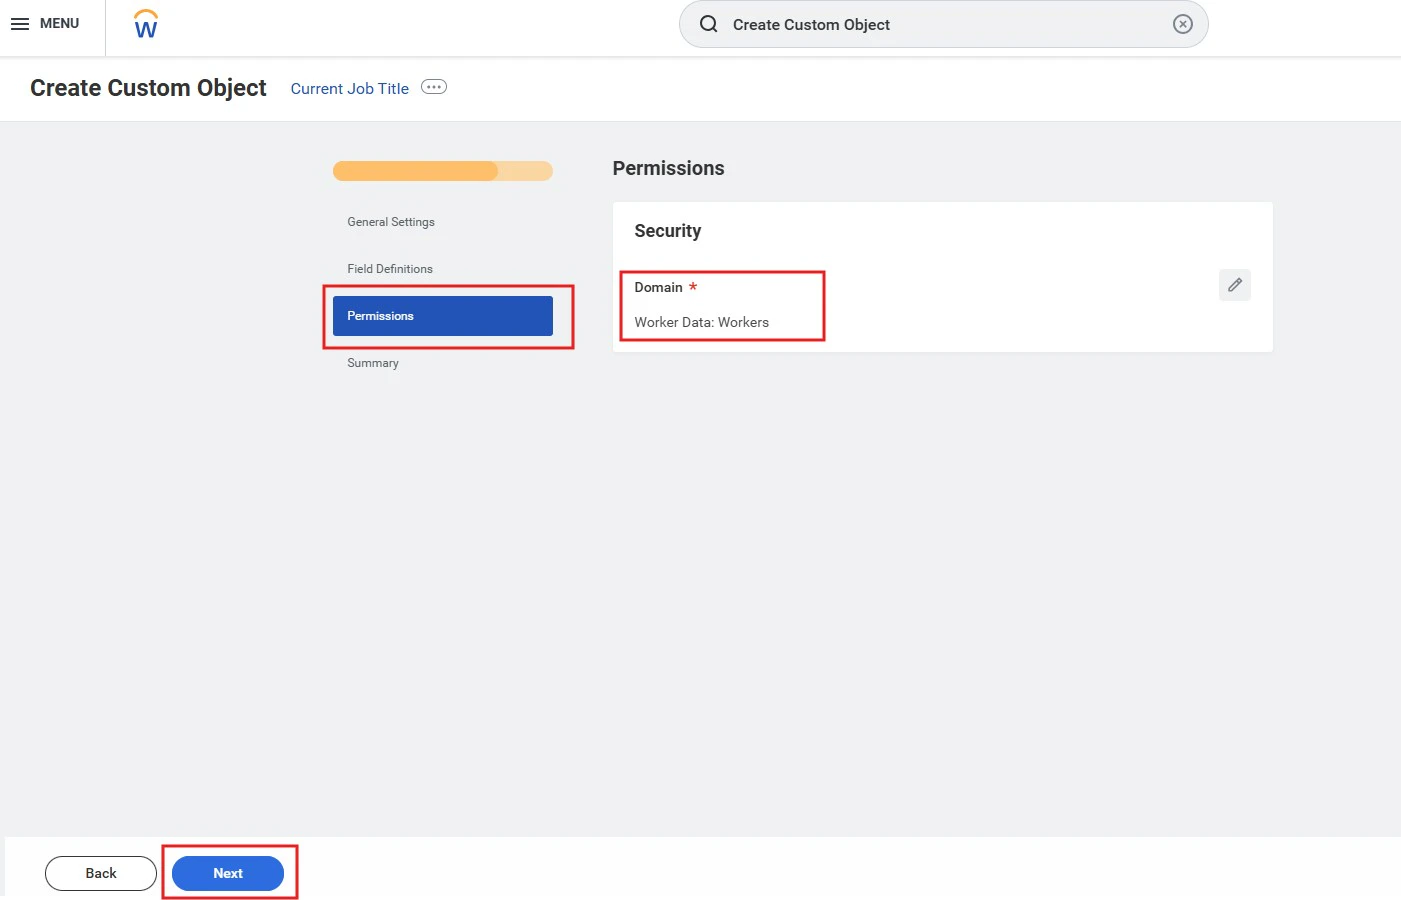
  <Step title="Select 'Worker Data: Workers'">
    Select <b>Worker Data: Workers</b> in Permissions tab and click <b>Next</b>.

    <Frame>
      <img className="rounded-md" style={{ margin: '0 auto', border: '1px solid #efefef' }} alt="Select Permission" src="https://mintcdn.com/stackone-hub-docs-confluence-api-token-update/w__eN0U5iLwN8ehP/images/workday/custom-field/custom-field-26.jpg?fit=max&auto=format&n=w__eN0U5iLwN8ehP&q=85&s=487108960822343203fe7ce8e770d075" width="1401" height="900" data-path="images/workday/custom-field/custom-field-26.jpg" />
    </Frame>
  </Step>

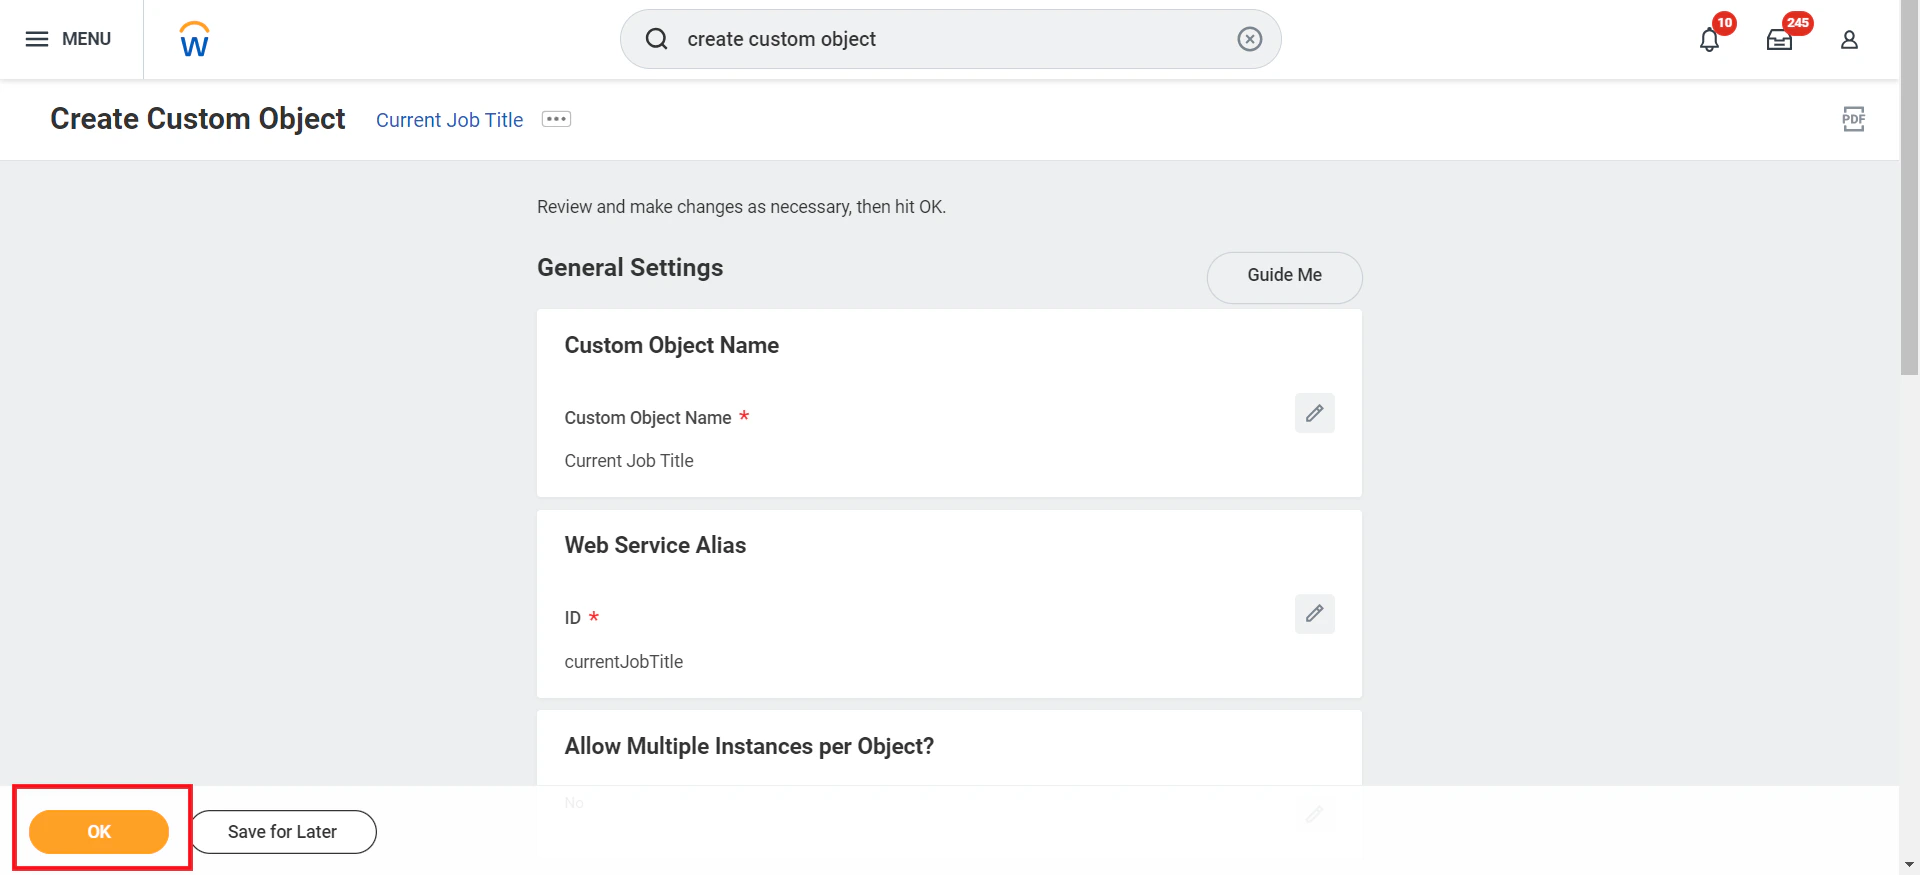
  <Step title="Review and Confirm">
    Verify the custom object summary and click <b>OK</b>

    <Frame>
      <img className="rounded-md" style={{ margin: '0 auto', border: '1px solid #efefef' }} alt="Review and Confirm" src="https://mintcdn.com/stackone-hub-docs-confluence-api-token-update/w__eN0U5iLwN8ehP/images/workday/custom-field/custom-field-07.png?fit=max&auto=format&n=w__eN0U5iLwN8ehP&q=85&s=58618a9c9a4dc03de4c96d24f0871054" width="1920" height="875" data-path="images/workday/custom-field/custom-field-07.png" />
    </Frame>
  </Step>

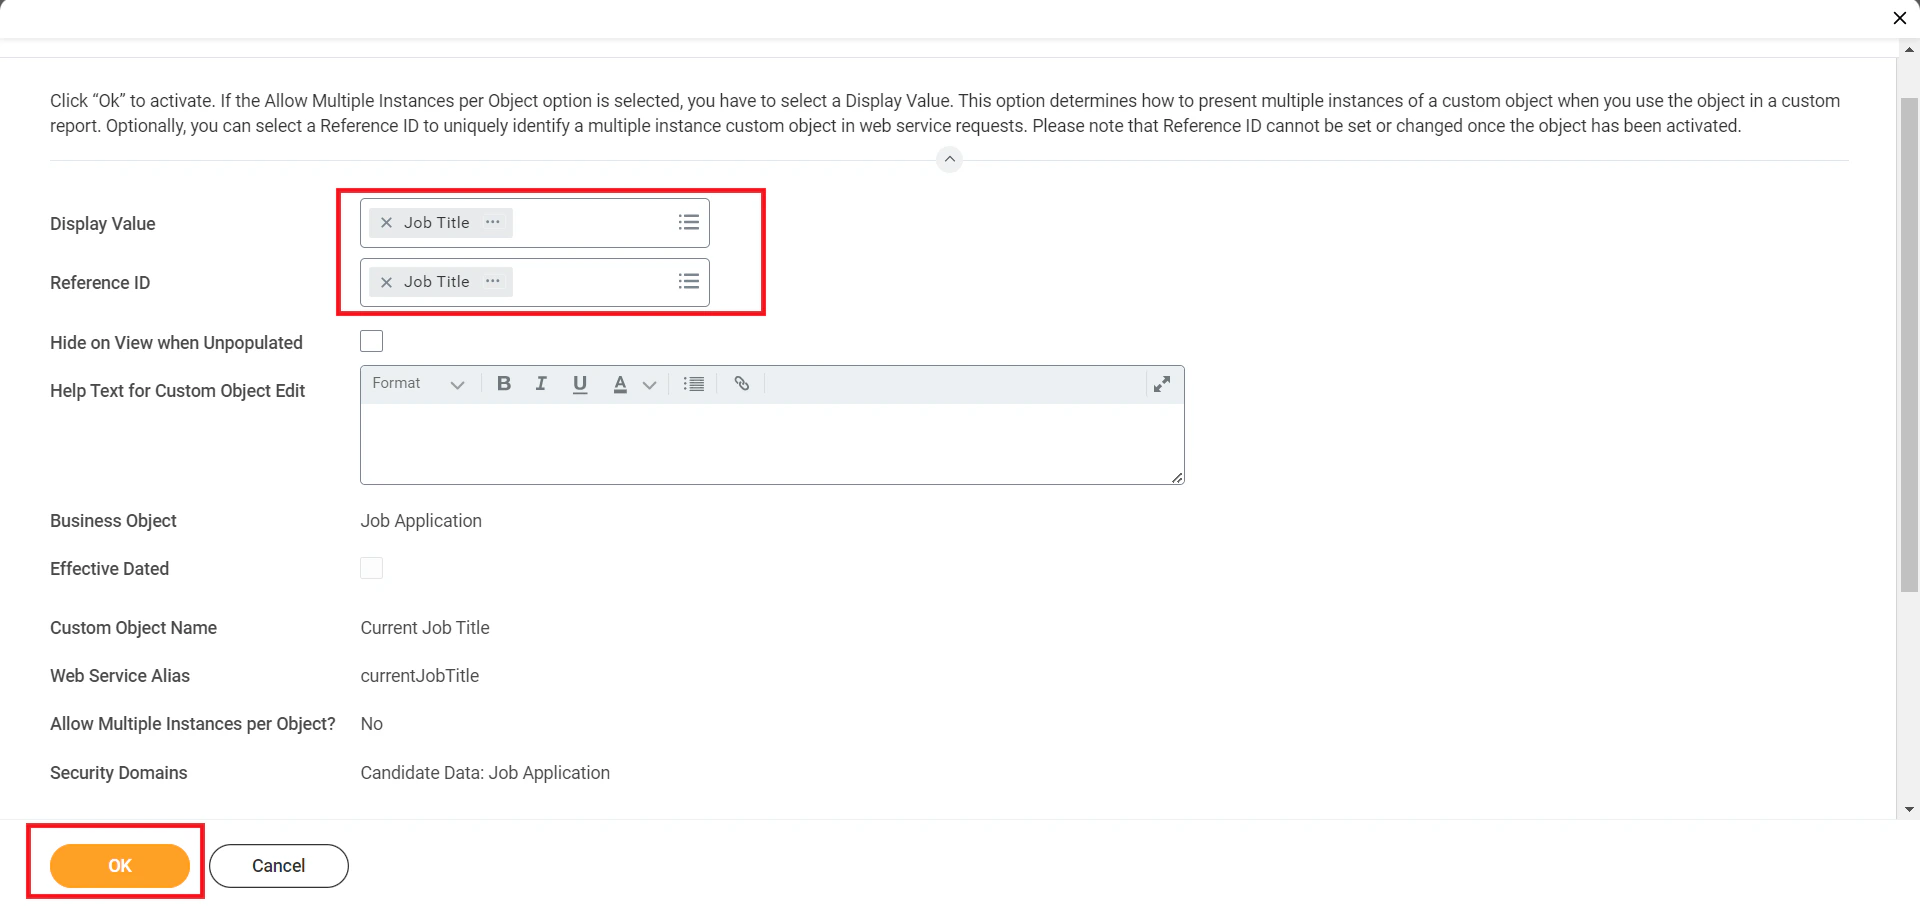
  <Step title="Configure Field Selection">
    Select the newly created custom field from the <b>Display Value</b> and <b>Reference ID</b> dropdowns if the Allow Multiple Instances per Object option is selected, and click <b>OK</b>.

    <Frame>
      <img className="rounded-md" style={{ margin: '0 auto', border: '1px solid #efefef' }} alt="Configure Field Selection" src="https://mintcdn.com/stackone-hub-docs-confluence-api-token-update/w__eN0U5iLwN8ehP/images/workday/custom-field/custom-field-08.png?fit=max&auto=format&n=w__eN0U5iLwN8ehP&q=85&s=9109d305a7e998e50efabb4a0a1ab814" width="1920" height="909" data-path="images/workday/custom-field/custom-field-08.png" />
    </Frame>
  </Step>

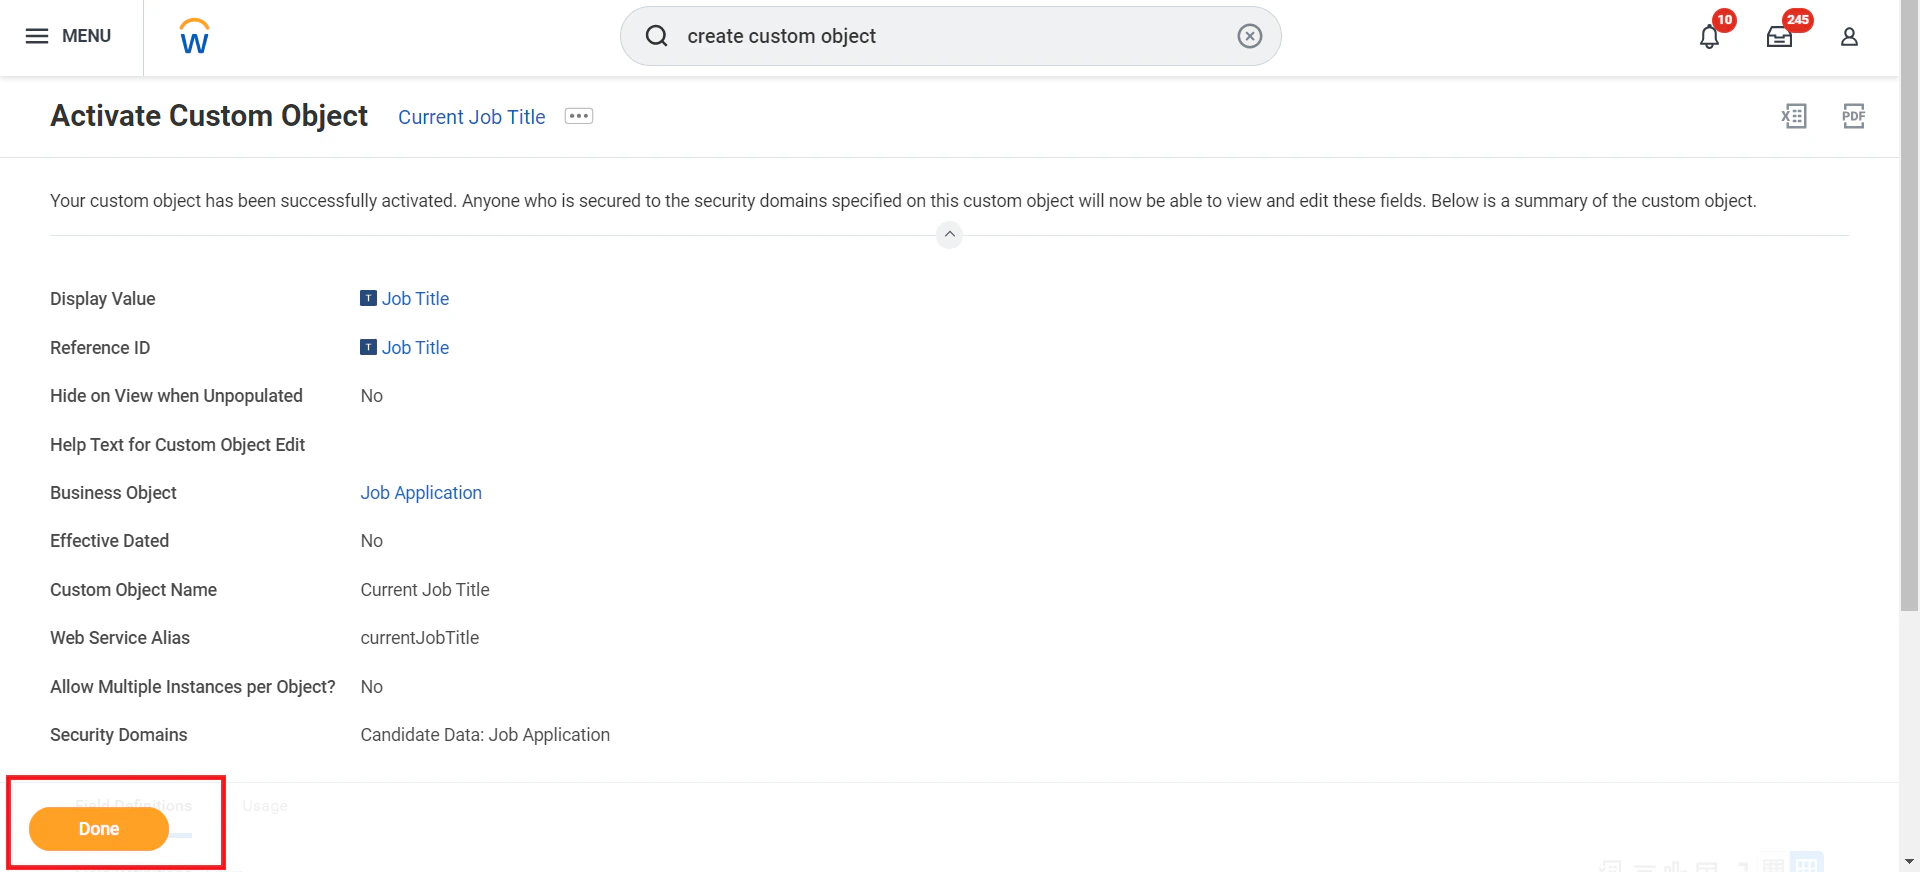
  <Step title="Activate Custom Object">
    Activate the custom object by clicking <b>Done</b>

    <Frame>
      <img className="rounded-md" style={{ margin: '0 auto', border: '1px solid #efefef' }} alt="Activate Custom Object" src="https://mintcdn.com/stackone-hub-docs-confluence-api-token-update/w__eN0U5iLwN8ehP/images/workday/custom-field/custom-field-09.png?fit=max&auto=format&n=w__eN0U5iLwN8ehP&q=85&s=fc33613d40436d4868ea1bb3eb8283c7" width="1920" height="872" data-path="images/workday/custom-field/custom-field-09.png" />
    </Frame>
  </Step>
</Steps>

## Additional Steps to Add Custom Objects in the Business Process Definition

<Steps>
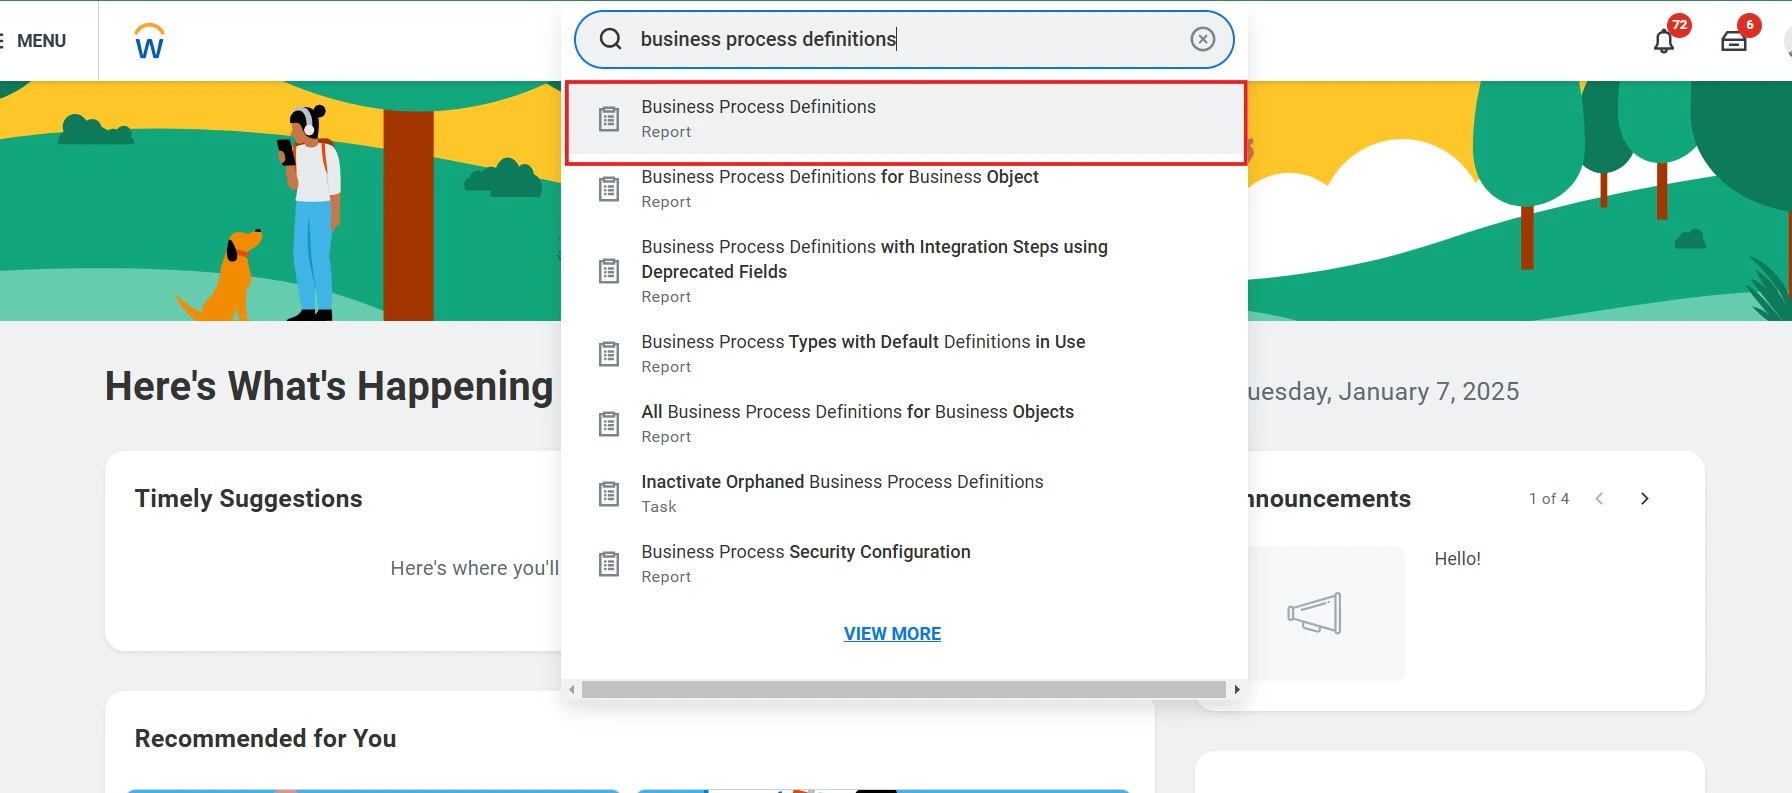
  <Step title="Search for 'Business Process Definitions'">
    Search for <b>Business Process Definitions</b> in the search bar and select it.

    <Frame>
      <img className="rounded-md" style={{ margin: '0 auto', border: '1px solid #efefef' }} alt="Search Business Process Definitions" src="https://mintcdn.com/stackone-hub-docs-confluence-api-token-update/w__eN0U5iLwN8ehP/images/workday/custom-field/custom-field-10.jpg?fit=max&auto=format&n=w__eN0U5iLwN8ehP&q=85&s=e94a82569e1dc43f2b9dc77c73df4466" width="1792" height="793" data-path="images/workday/custom-field/custom-field-10.jpg" />
    </Frame>
  </Step>

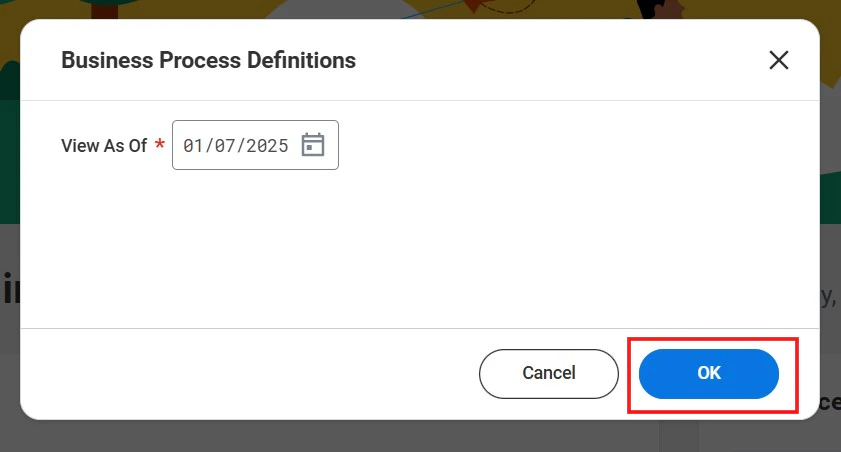
  <Step title="Click 'OK'">
    <Frame>
      <img className="rounded-md" style={{ margin: '0 auto', border: '1px solid #efefef' }} alt="Click OK" src="https://mintcdn.com/stackone-hub-docs-confluence-api-token-update/w__eN0U5iLwN8ehP/images/workday/custom-field/custom-field-11.png?fit=max&auto=format&n=w__eN0U5iLwN8ehP&q=85&s=1f7d2d5b743452ffcbd9b52f4d2cf4aa" width="841" height="452" data-path="images/workday/custom-field/custom-field-11.png" />
    </Frame>
  </Step>

  <Step title="Find and Edit Business Process Definition">
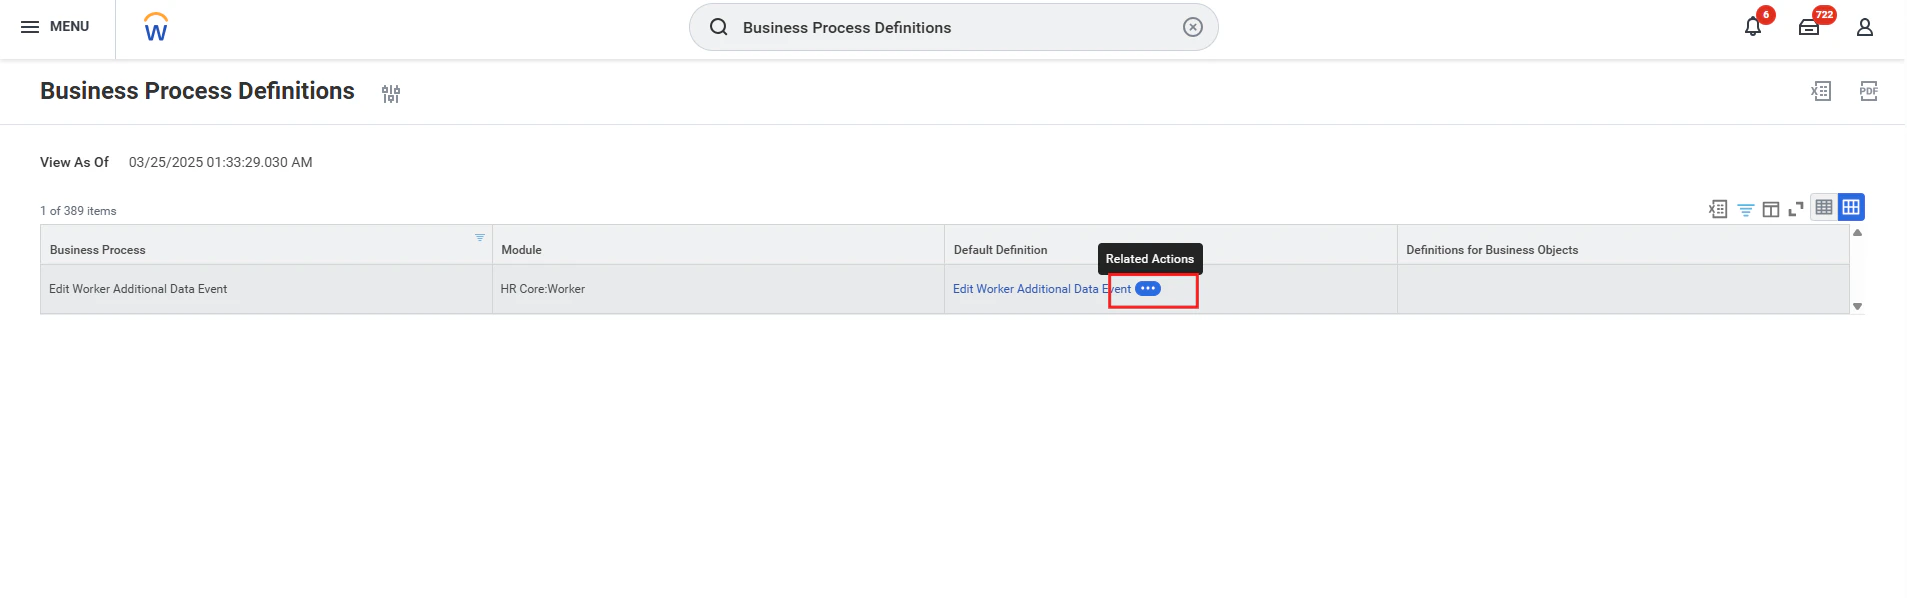
    Find <b>Edit Worker Additional Data Event</b> business process. Click the three dots (...) in the Default Definition column of the Edit Worker Additional Data Event.
    <Frame>
      <img className="rounded-md" style={{ margin: '0 auto', border: '1px solid #efefef' }} alt="Find and Edit Business Process Definition" src="https://mintcdn.com/stackone-hub-docs-confluence-api-token-update/w__eN0U5iLwN8ehP/images/workday/custom-field/custom-field-27.png?fit=max&auto=format&n=w__eN0U5iLwN8ehP&q=85&s=b0fa9b6991c2dea25d55b873e2348c2d" width="1907" height="598" data-path="images/workday/custom-field/custom-field-27.png" />
    </Frame>
  </Step>

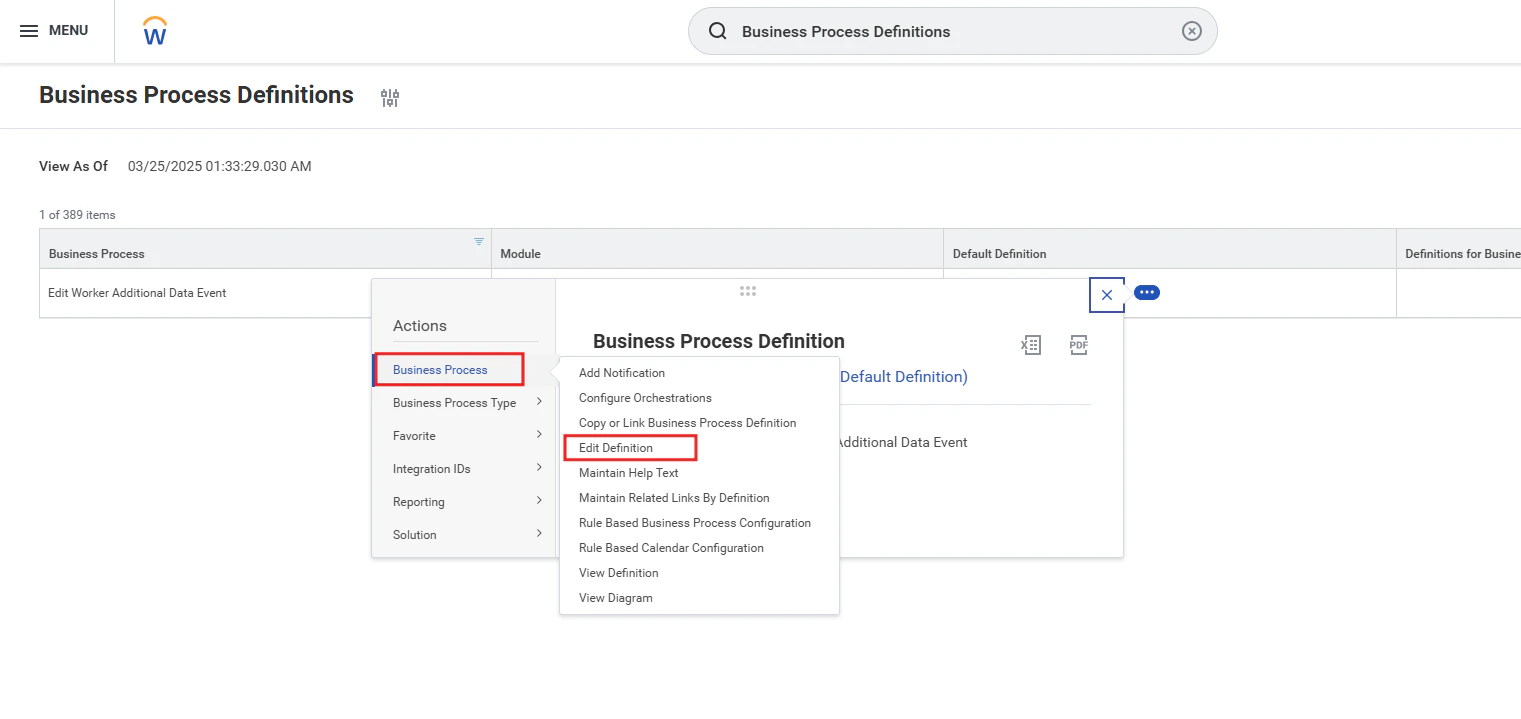
  <Step title="Click 'Edit Definition'">
    Click <b>Edit Definition</b> under the Business Process tab.

    <Frame>
      <img className="rounded-md" style={{ margin: '0 auto', border: '1px solid #efefef' }} alt="Edit Definition" src="https://mintcdn.com/stackone-hub-docs-confluence-api-token-update/w__eN0U5iLwN8ehP/images/workday/custom-field/custom-field-28.png?fit=max&auto=format&n=w__eN0U5iLwN8ehP&q=85&s=617ad59834e16e59b155af46448cb5a5" width="1521" height="719" data-path="images/workday/custom-field/custom-field-28.png" />
    </Frame>
  </Step>

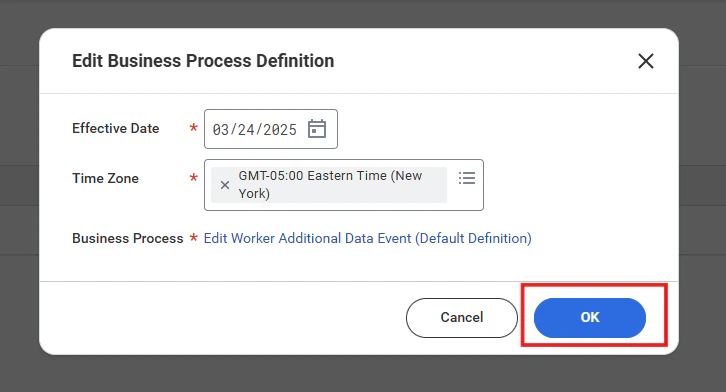
  <Step title="Click 'OK'">
    <Frame>
      <img className="rounded-md" style={{ margin: '0 auto', border: '1px solid #efefef' }} alt="Click OK" src="https://mintcdn.com/stackone-hub-docs-confluence-api-token-update/w__eN0U5iLwN8ehP/images/workday/custom-field/custom-field-29.png?fit=max&auto=format&n=w__eN0U5iLwN8ehP&q=85&s=35604bcff7851da6adda6b6b5b592b7f" width="726" height="392" data-path="images/workday/custom-field/custom-field-29.png" />
    </Frame>
  </Step>

  <Step title="Configure Business Process Steps">
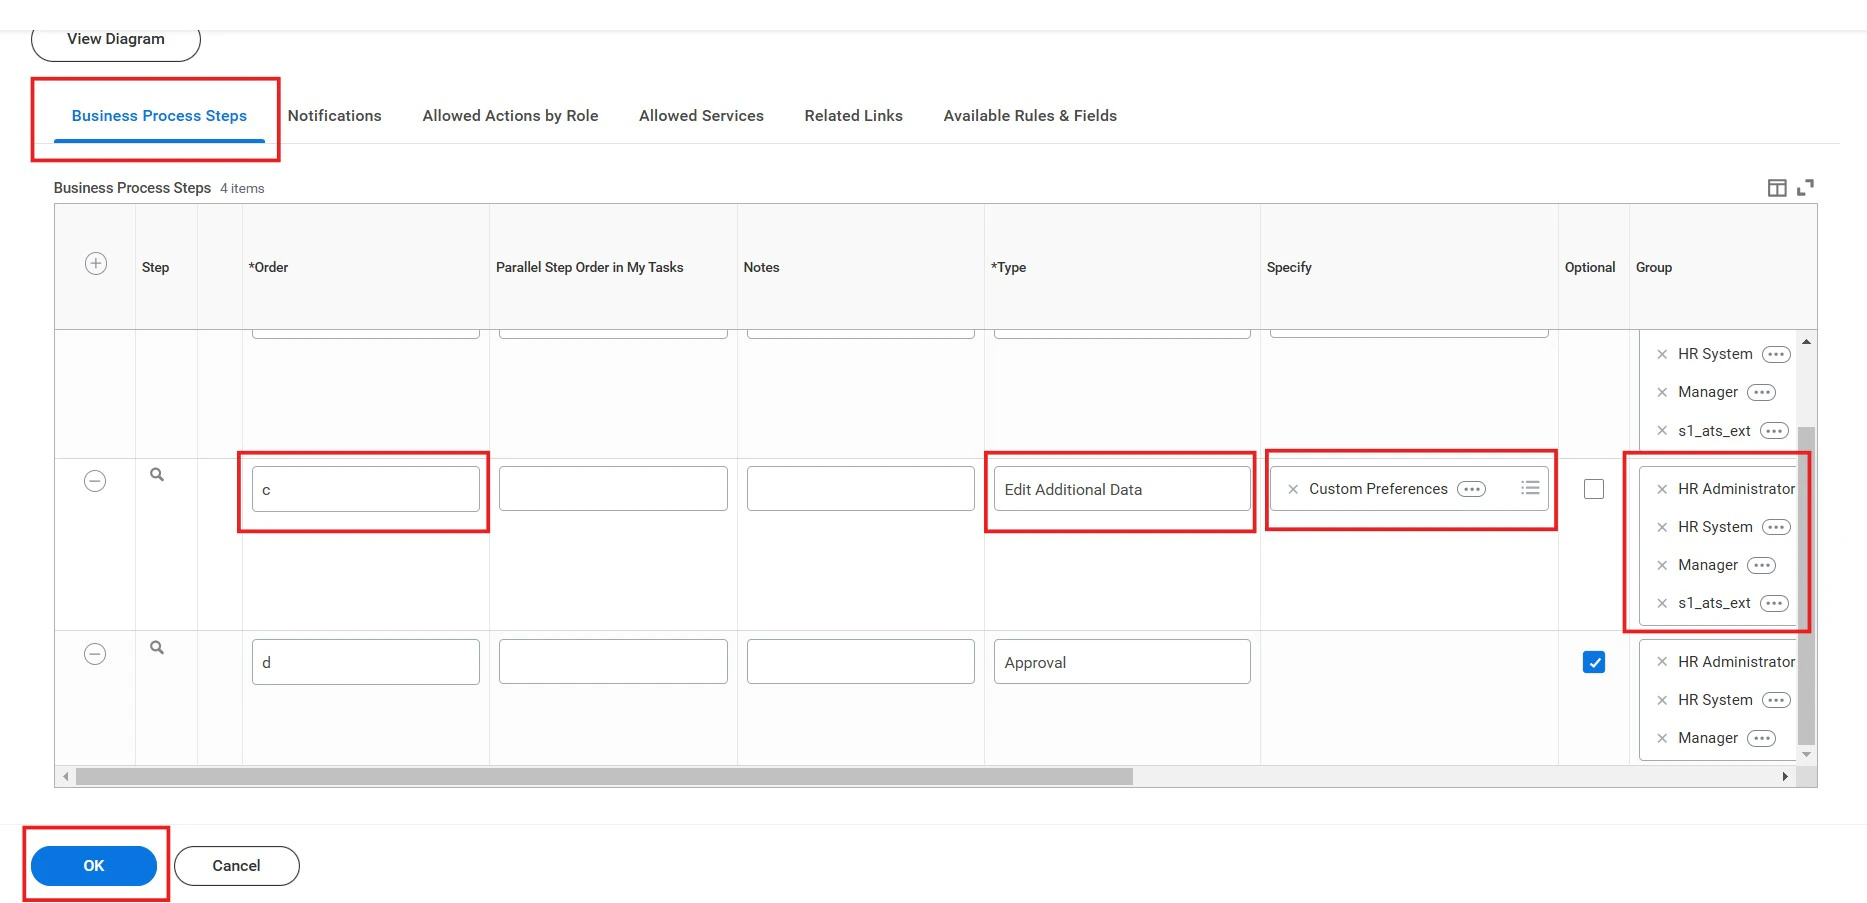
    In the Business Process Steps tab:

    <ul>
      <li>Enter the order alphabetically in the Order column.</li>
      <li>Select <b>Edit Additional Data</b> in the Type column.</li>
      <li>Choose the newly created custom object in the Specify column.</li>
      <li>Assign the relevant security groups in the Group column.</li>
      <li>Click "OK"</li>
    </ul>

    <Frame>
      <img className="rounded-md" style={{ margin: '0 auto', border: '1px solid #efefef' }} alt="Configure Business Process Steps" src="https://mintcdn.com/stackone-hub-docs-confluence-api-token-update/w__eN0U5iLwN8ehP/images/workday/custom-field/custom-field-15.jpg?fit=max&auto=format&n=w__eN0U5iLwN8ehP&q=85&s=cf1b491f0aa414347bb45ef0a9531762" width="1867" height="903" data-path="images/workday/custom-field/custom-field-15.jpg" />
    </Frame>
  </Step>

  <Step title="Verify and Complete">
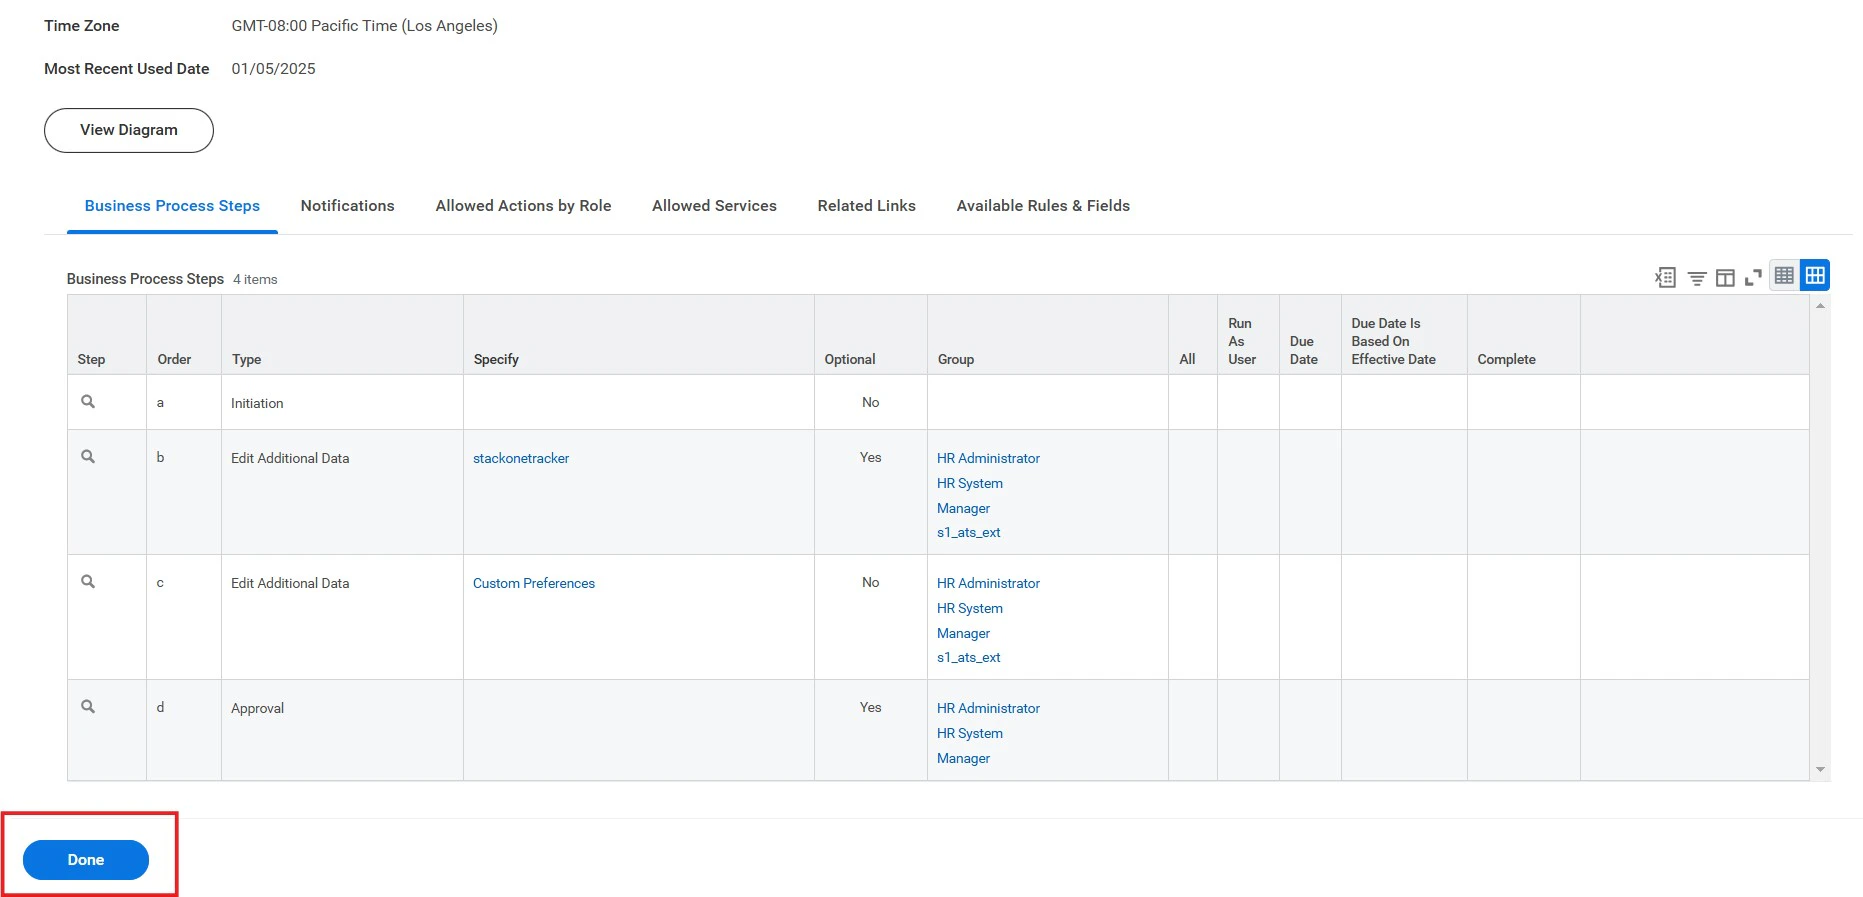
    Verify and Click <b>Done</b>.

    <Frame>
      <img className="rounded-md" style={{ margin: '0 auto', border: '1px solid #efefef' }} alt="Verify and Complete" src="https://mintcdn.com/stackone-hub-docs-confluence-api-token-update/w__eN0U5iLwN8ehP/images/workday/custom-field/custom-field-16.jpg?fit=max&auto=format&n=w__eN0U5iLwN8ehP&q=85&s=8cc7c542382487e893a59d5b85c04413" width="1863" height="897" data-path="images/workday/custom-field/custom-field-16.jpg" />
    </Frame>
  </Step>
</Steps>

<Note>
  Note: Changes to Worker Effective-Dated Custom Field values made through the API must be approved via the UI.
</Note>

<br />

Congratulations, you're all set! If you face any issues with the steps mentioned above,
please contact us by emailing [integrations@stackone.com](mailto:integrations@stackone.com). We're always here to assist you!